Add Exams for a Single Candidate
Once candidates have been added to a candidate list, you may schedule their exams. Scheduling is done in four basic steps: 1) select the exam or exams and add accommodations, 2) select a test center and time, 3) enter payment and billing information, and 4) submit the order.
When you add exams for a single candidate on an order, you may purchase the exams via vouchers, promo codes or discounts, or via credit card payment. You may add up to 30 exams on a single order.
- View the desired candidate list.
- Locate the desired candidate on the Candidate List Details page.
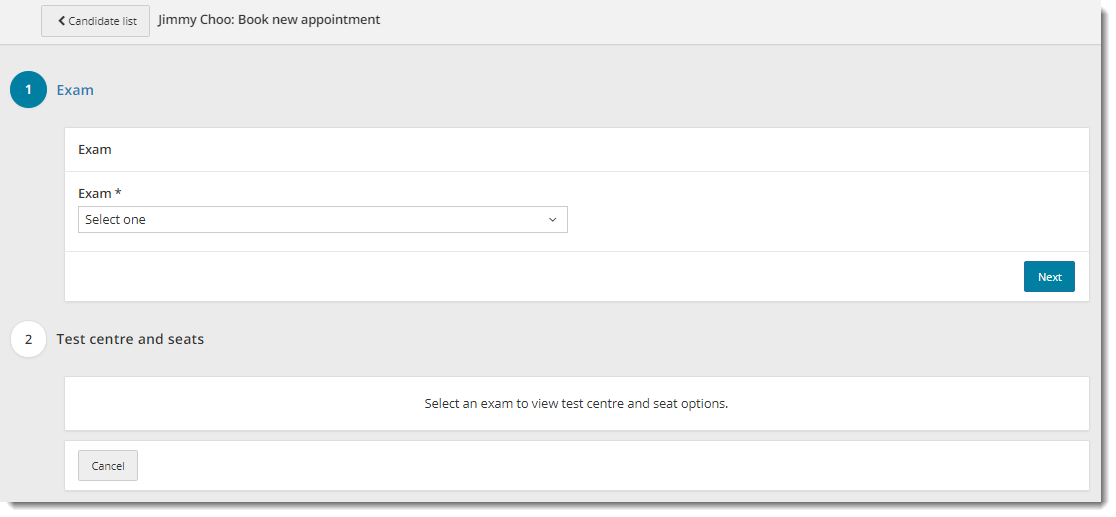
- Click Add exam and the Book new appointment page opens.


When you add an exam to an order, the system puts a hold on the exam time and location for up to 2 hours. You must submit the order within that 2 hours or the hold will be released. When you are within 10 minutes of the 2-hour limit, the system generates a warning notifying you that you must complete your order within the next 10 minutes or the appointment will no longer be held. ![]()
![]()
Add exams
You may add a single exam to an order, add modular exams to an order, or add exams scheduled back-to-back consecutively.
- Add exams and select the desired language.
Add single exam
- Click the Exam drop-down list in the Exam section and select an exam from the list. If there is only one language for the exam, the exam language is displayed below the selected exam.


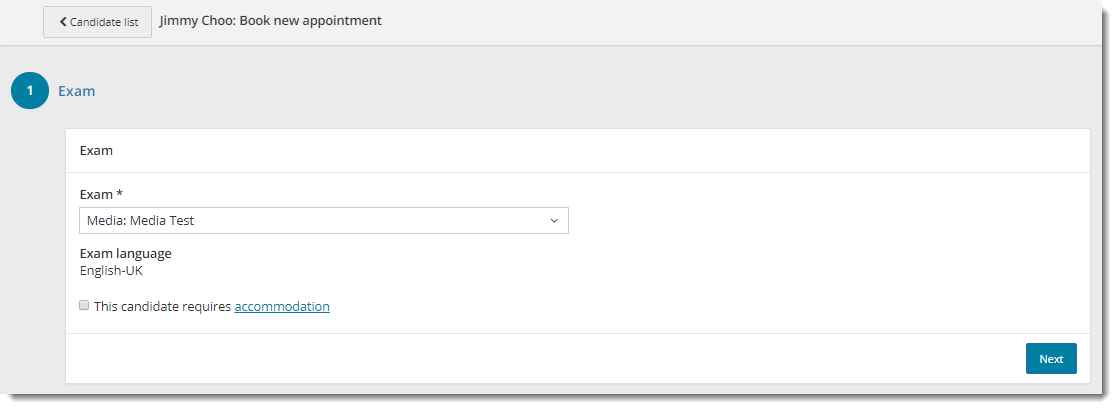
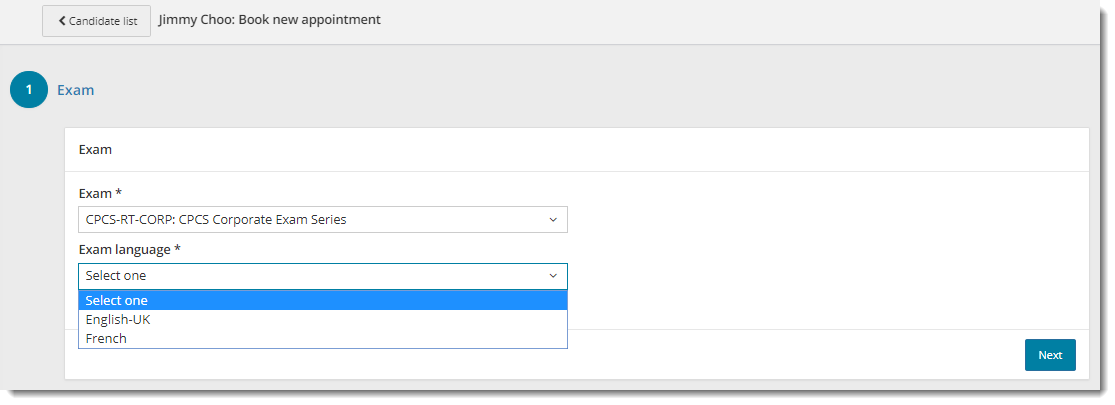
- If the exam may be delivered in multiple languages, click the Language drop-down list, and select the desired language from the list.


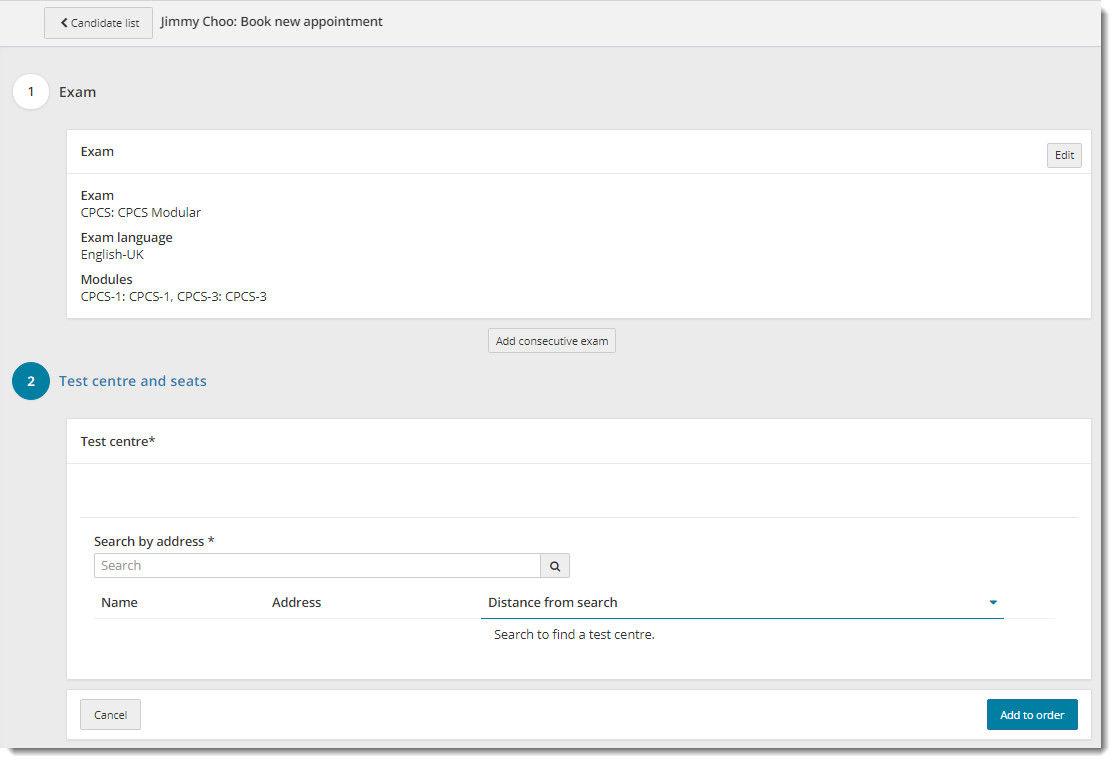
Add modular exam
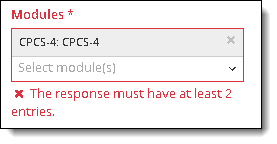
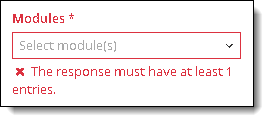
When adding a modular exam, you may select multiple modules. Some modular exams require you to select at least 2 exams. The modules are delivered in the order in which they are added to the order, so ask the candidate or the client in which order they would like to sit for the exams.
- Click the Exam drop-down list in the Exam section and select a modular exam from the list. The exam language is displayed below the selected exam.
- If the exam may be delivered in multiple languages, click the Language drop-down list, and select the desired language from the list. The exam language is displayed below the selected exam and a Modules drop-down list appears.


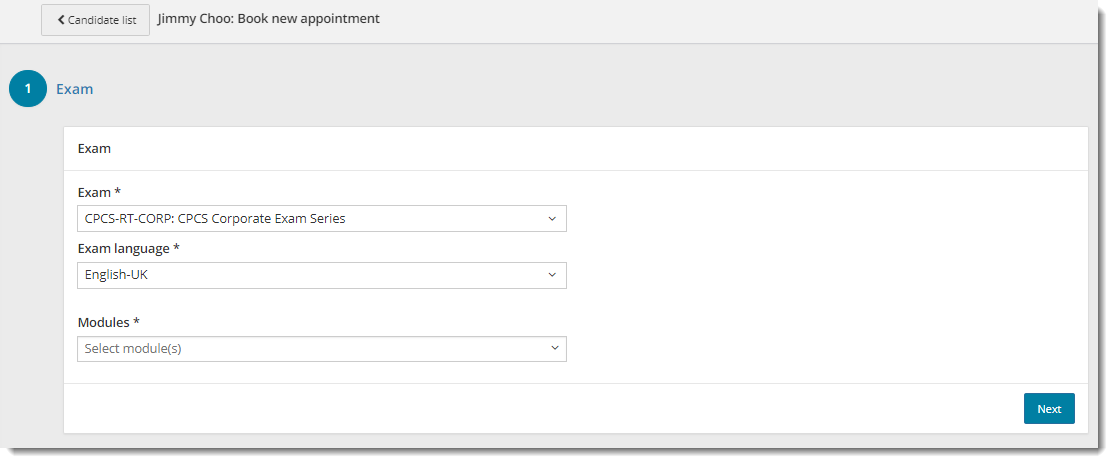
- Click the Modules drop-down list and select the desired module from the list. The module is added to the modules list.


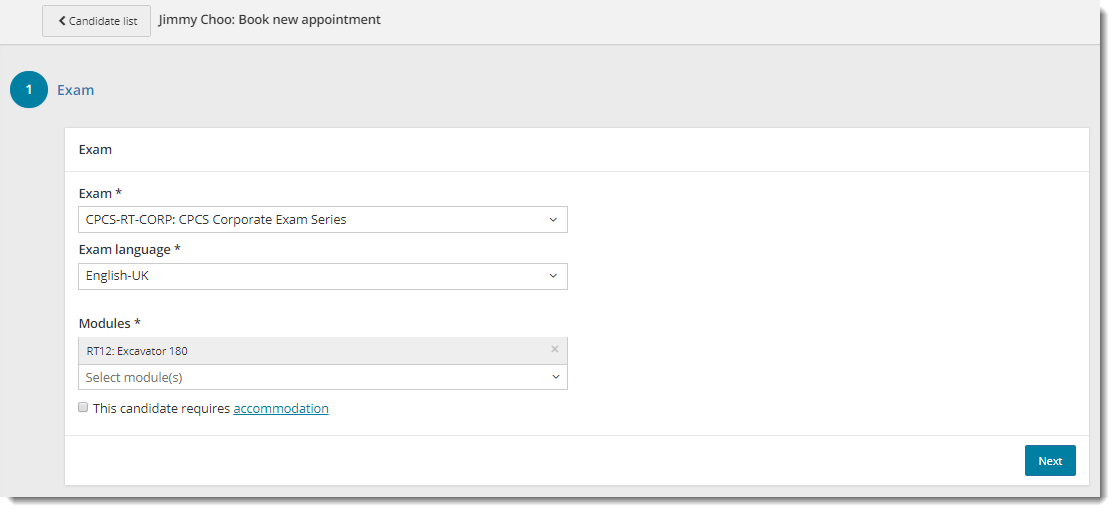
- Click the Modules drop-down list again and select the next desired module from the list.
- Continue adding modules to the exam.
- If you wish to remove a module, click the Delete module button
 for the desired module. If you have less than the required number of modules selected, an error message reminds you that at least x number of modules must be selected.

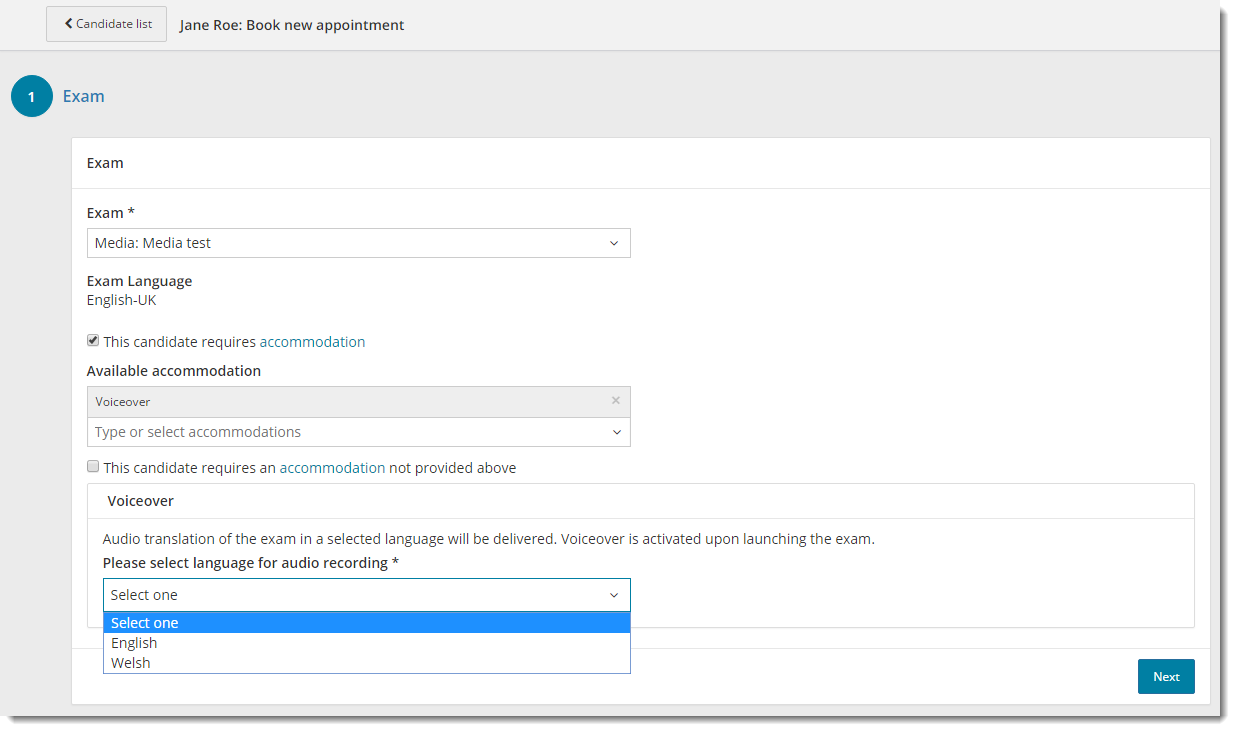
- Add Accommodations to the exam.
Add accommodations
For more information on the accommodations, click the accommodation link. The Pearson VUE Test accommodations page opens in a new tab. 


- Click the This candidate requires accommodation check box in the Exam section.


- Select the desired accommodation from the Available accommodation drop-down list.


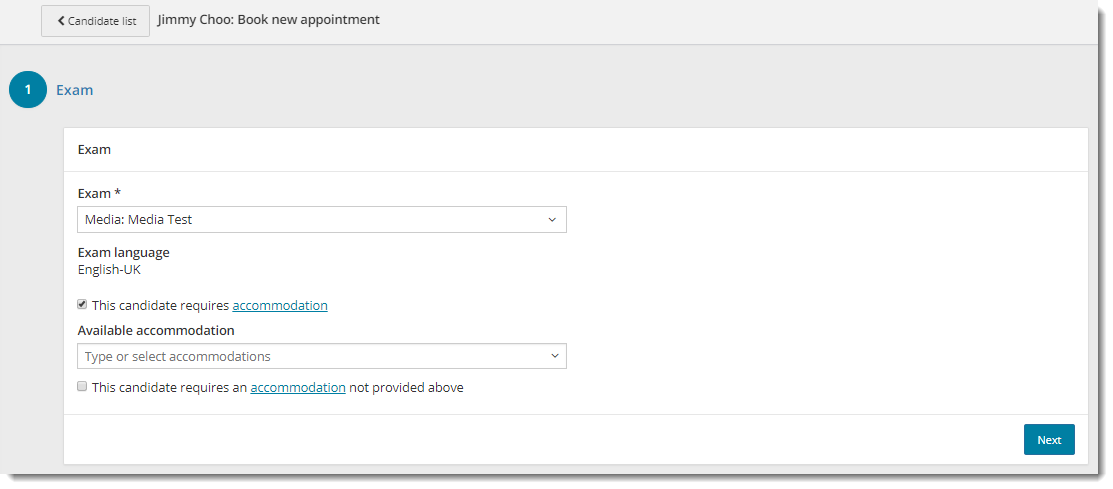
There are currently 2 accommodations available.
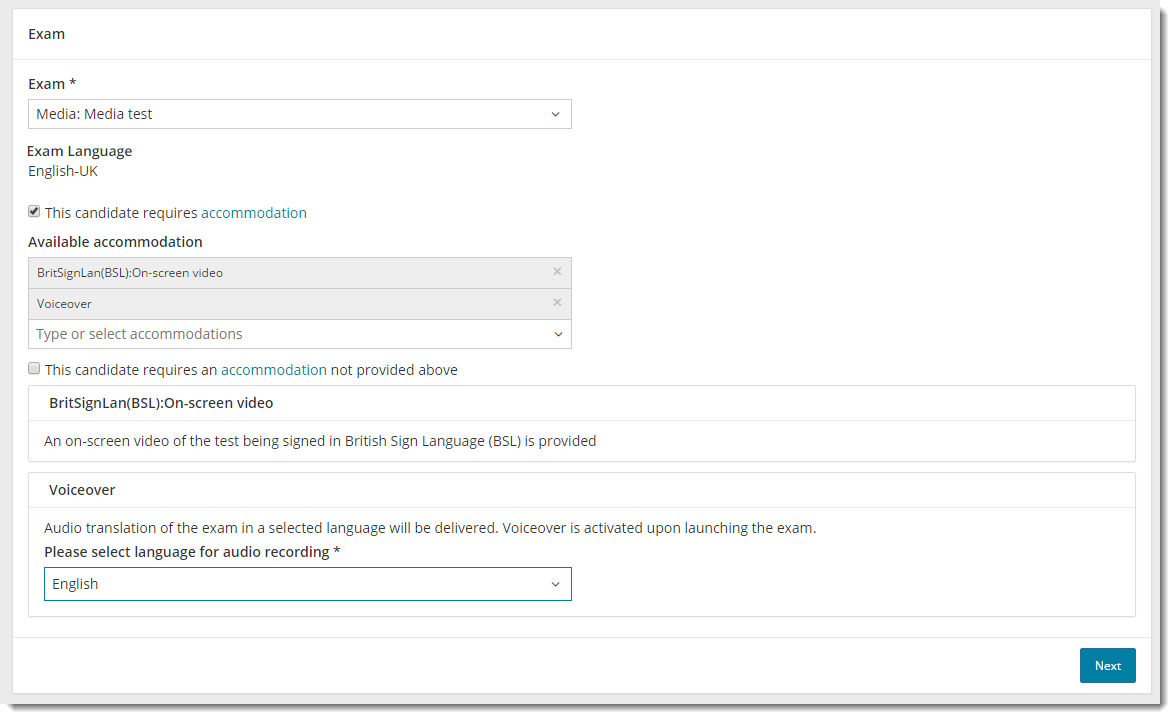
Once you select the accommodation, it is listed at the bottom of the exam section.
- You may add multiple accommodations for the exam by clicking in the Available accommodation field and selecting accommodations from the drop-down list. The accommodations are listed at the bottom of the exam section in the order in which they were added.


Remove accommodations
You may remove an accommodation prior to clicking the Next button.
- Locate the desired accommodation in the Available accommodations list.


- Click the Delete
 button for the desired accommodation.
The accommodation is no longer listed at the bottom of the Exam section.
Accommodations not provided above
Only a small number of accommodations may be added to an exam within Scheduler. If a candidate requires an accommodation not listed in the Available accommodations list, you must contact customer service to register the candidate for the exam. You are unable to register the candidate via Scheduler.
- Select the This candidate requires accommodation check box and check for the desired accommodation.
- Click the This candidate requires an accommodation not provided above check box.


- A message states you are unable to book a candidate with an accommodation not listed.


You have 3 options:
|
- Once you have selected the desired exam and added the required accommodations, click Next.
- You may schedule multiple exams for a candidate. Exams are automatically scheduled back-to-back starting with the first exam you added. If you wish to add more exams to the order, but do not want to schedule the exams back-to-back, you must add the first exam to the order and then you may add more exams to the order.
Add consecutive or back-to-back exams
- Click Add consecutive exam. Exam section opens.


- Click the Exam drop-down list in the Exam section and select an exam from the list. The exam language is displayed below the selected exam.
- Click Next. Exam is added to the order.


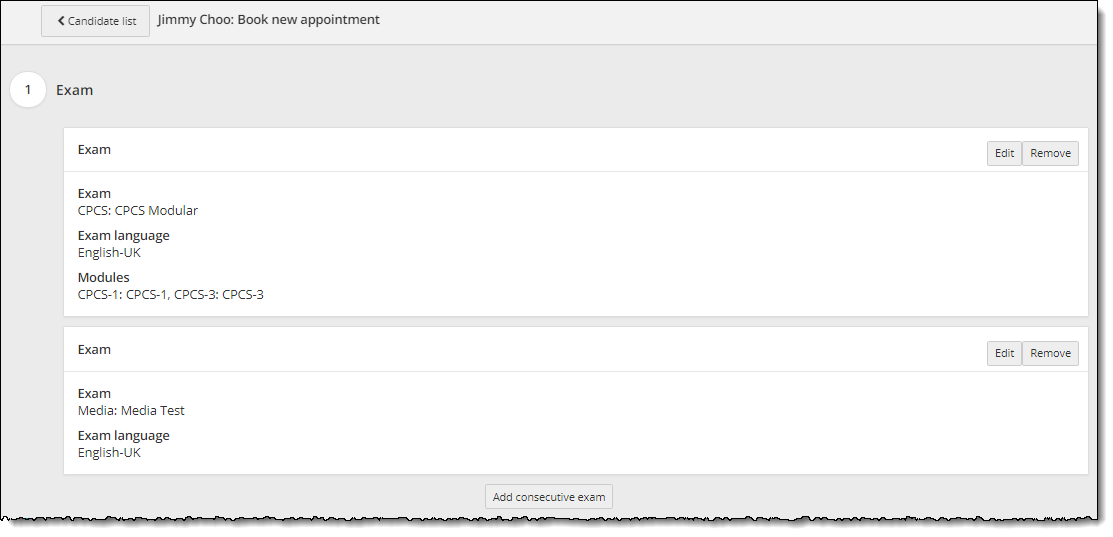
Edit an exam before adding it to an order
You may edit an exam on an order if you have not submitted the order. The edit button is available when adding exams to an order.
- Locate the exam you wish to change and click the Edit button.


- Click the Exam drop-down list in the Exam section and select the desired exam in the list.
- Click Next.
Remove an exam before adding it to an order
Every order must have at least one exam on the order. You are only allowed to remove an exam from an order if there is more than one exam on the order. You may only remove an exam from an order if the order has not been submitted. The remove button is available when adding exams to an order.
- Locate the exam you wish to remove from the order and click the Remove button.

 The exam is removed from the order. The system does not ask you to confirm you want to remove the exam, it automatically removes it from the order. You must add it back on to the order if you inadvertently removed the exam.
Add test centre and seats to the exam registration
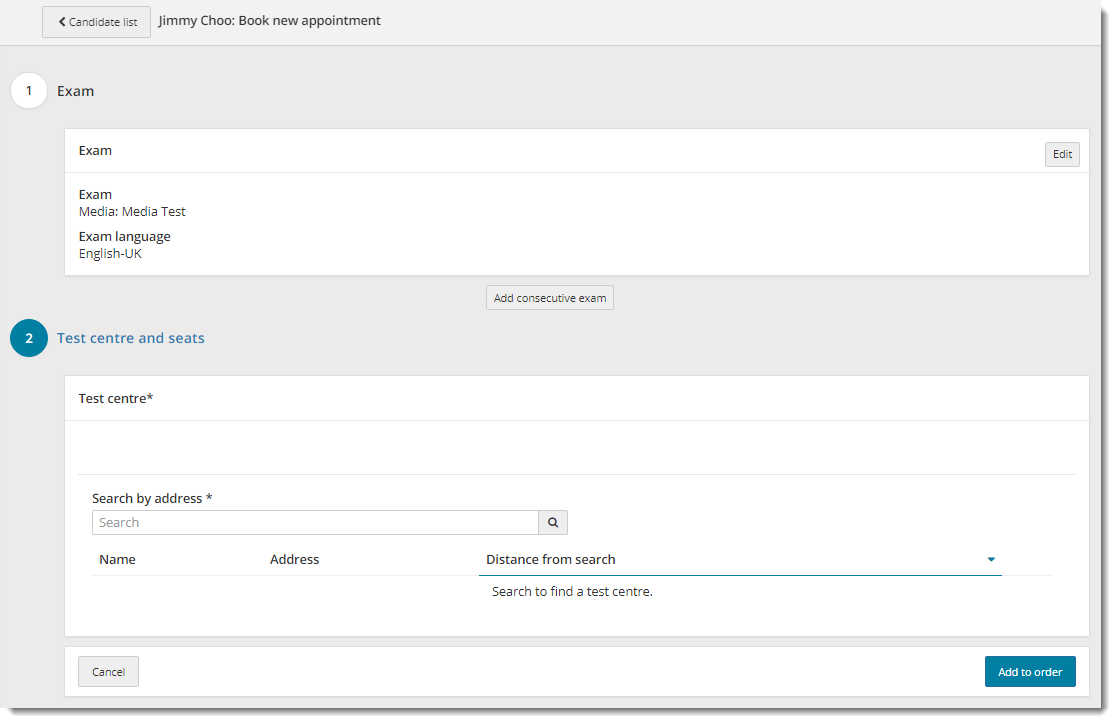
The test centre and seats section of the order is used to search for a test center based on an address, date and exam start time for the exam appointment. Only test centers and where the exam may be scheduled and times within which the exam may be scheduled are listed. ![]()
![]()
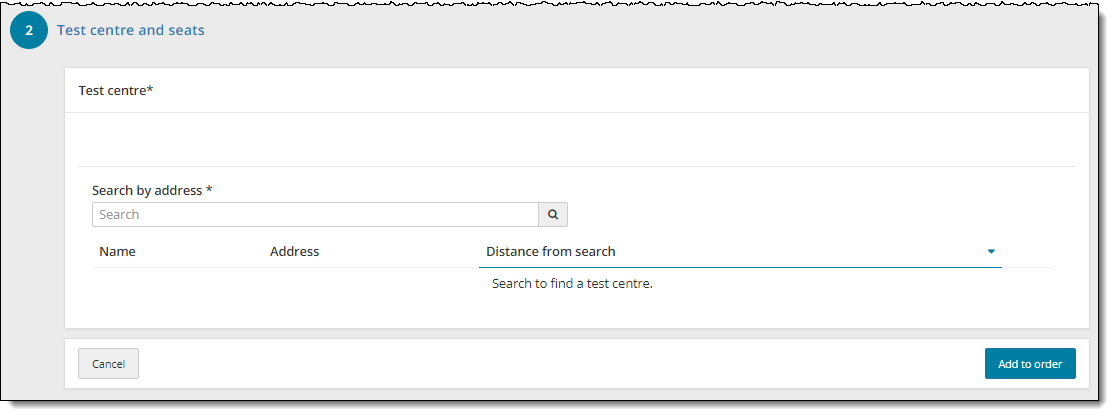
- To locate a test center near you, enter an address in the Search by address field and click the Search
 button.
A list of the 30 closest test centers is displayed. 

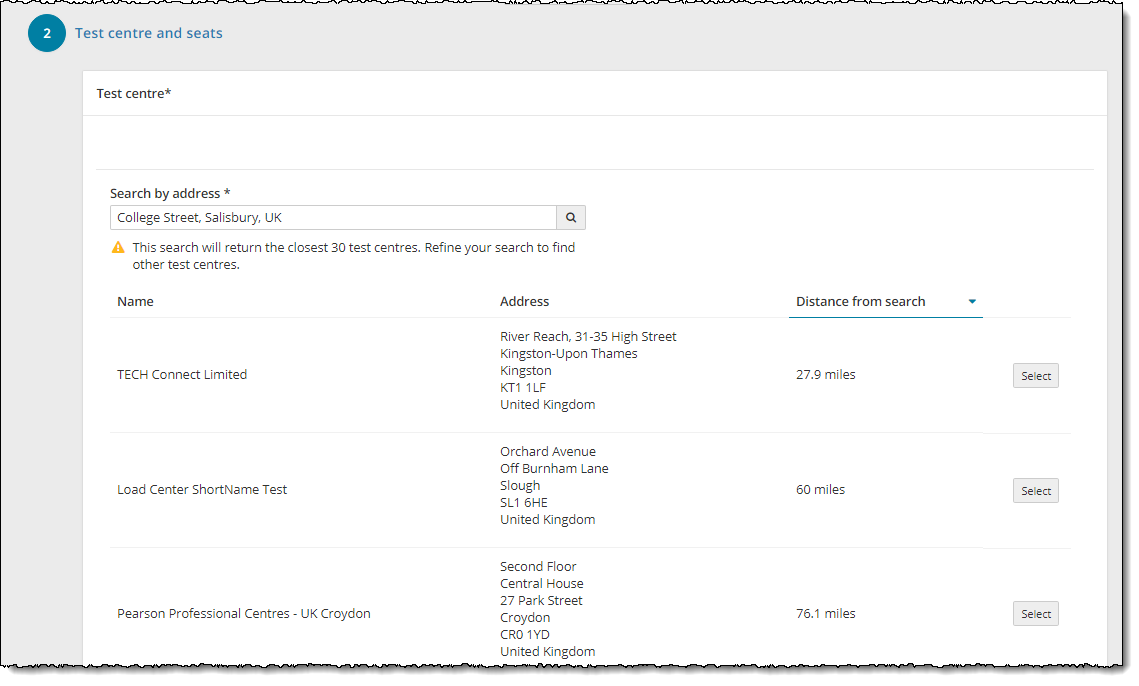
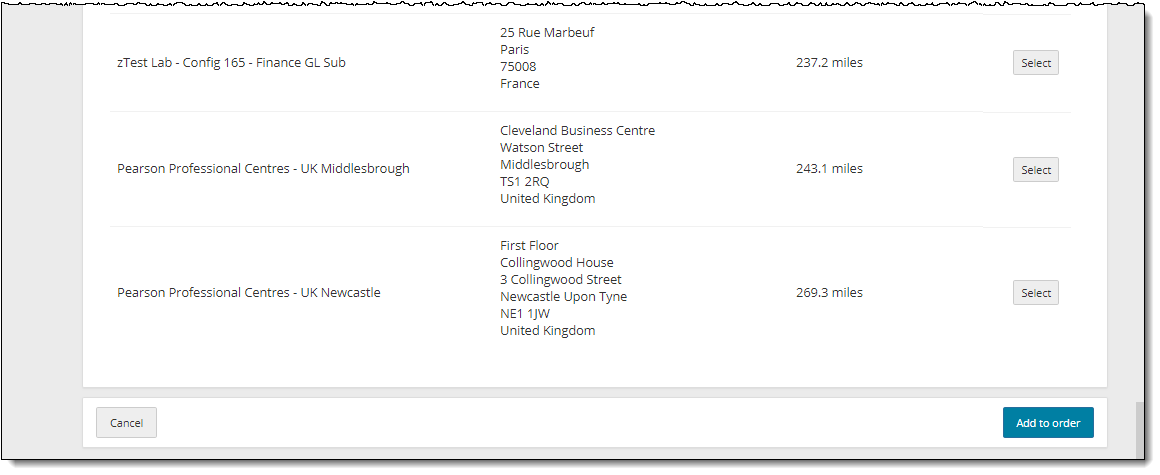
- Locate the desired test center in the list and click the Select button for that test center. The selected test center is listed and a Seats section opens with a calendar.


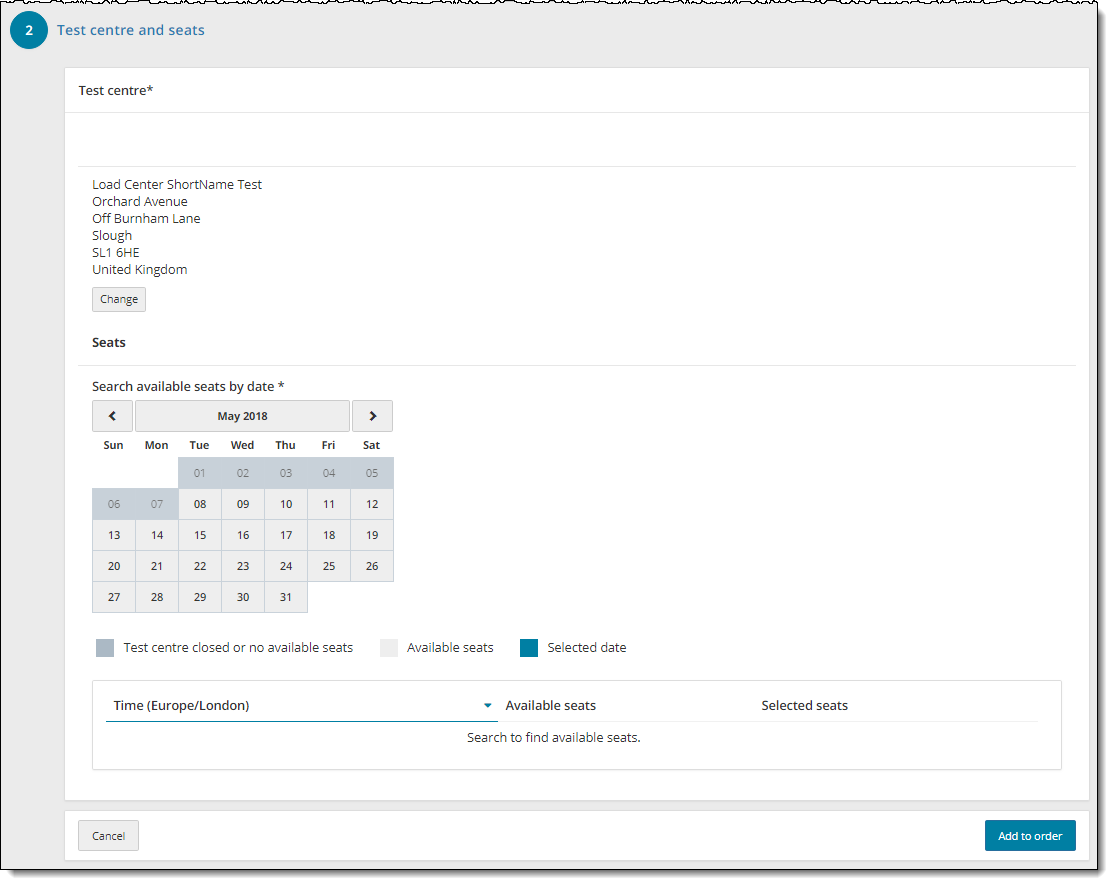
- If you selected the wrong test center, click the Change button listed below the selected test center. You are returned to the Search by address page. Select the desired test center.
- To scroll through the calendar one month at a time, click the scroll left
 and scroll right
  buttons.
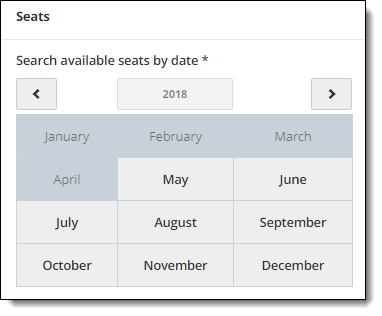
 - To select a month or year in the future more quickly, click the Month Year header
 . The calendar changes to display the year and months.

|
- Click the specific date on the calendar. The available seats and times section opens below the calendar.


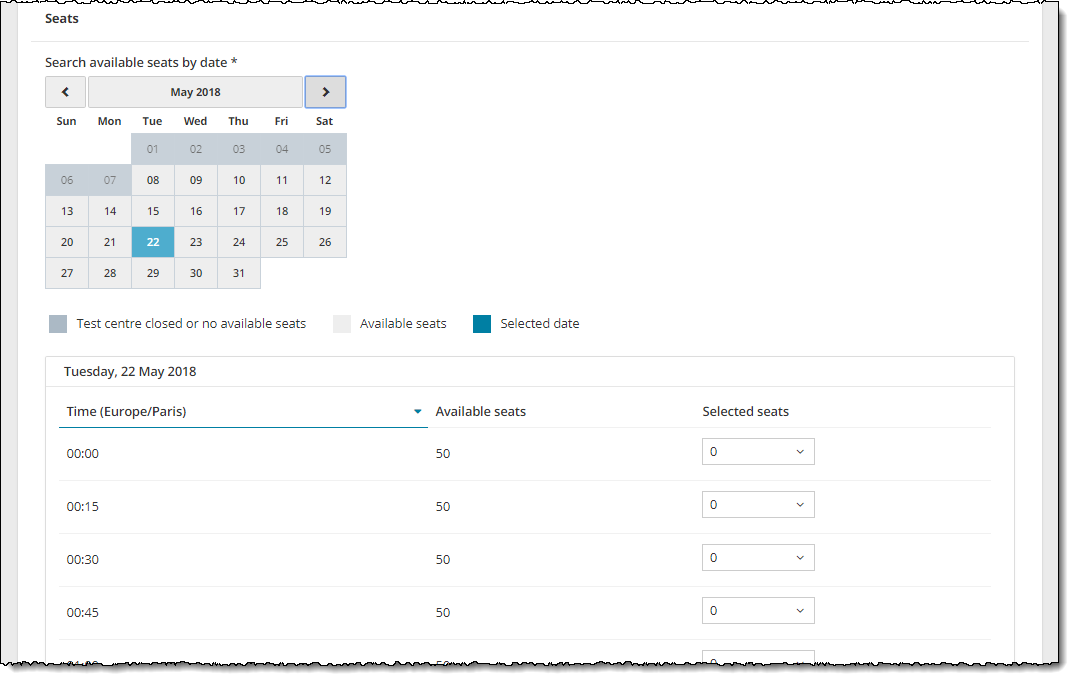
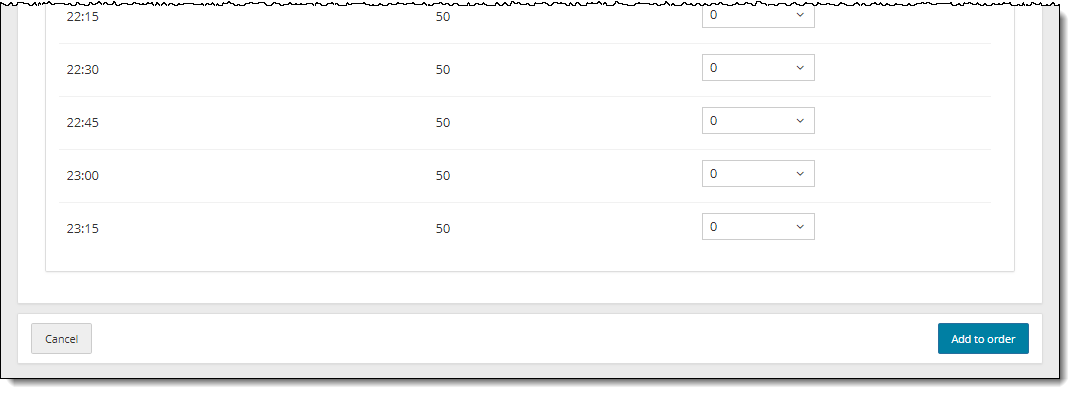
- Locate the desired time for the exam and click the Selected seats drop-down arrow. Select the number of seats you want to schedule from the list.


Cancel an order prior to adding exams to the order
You may cancel an order prior to adding the exams to the order.
- Click Cancel. The Candidate list details page appears.
Add exams to an order
- Click Add to order. The Candidate list page appears and a message states that one or more exams have been added to your order.


Notice the My order button in the upper right-hand corner now lists how many exams have been added to the order and the total cost of the order.
The Exam(s) on order column lists how many exams are on the order.
- If you wish to add more exams for the same candidate, click the Add exam button again and add another exam.
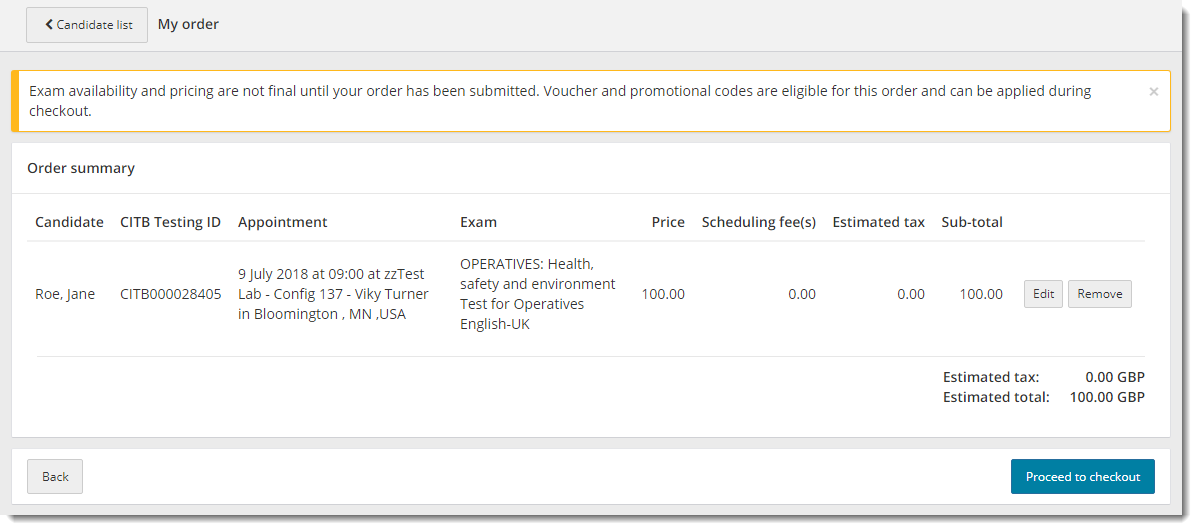
View the order
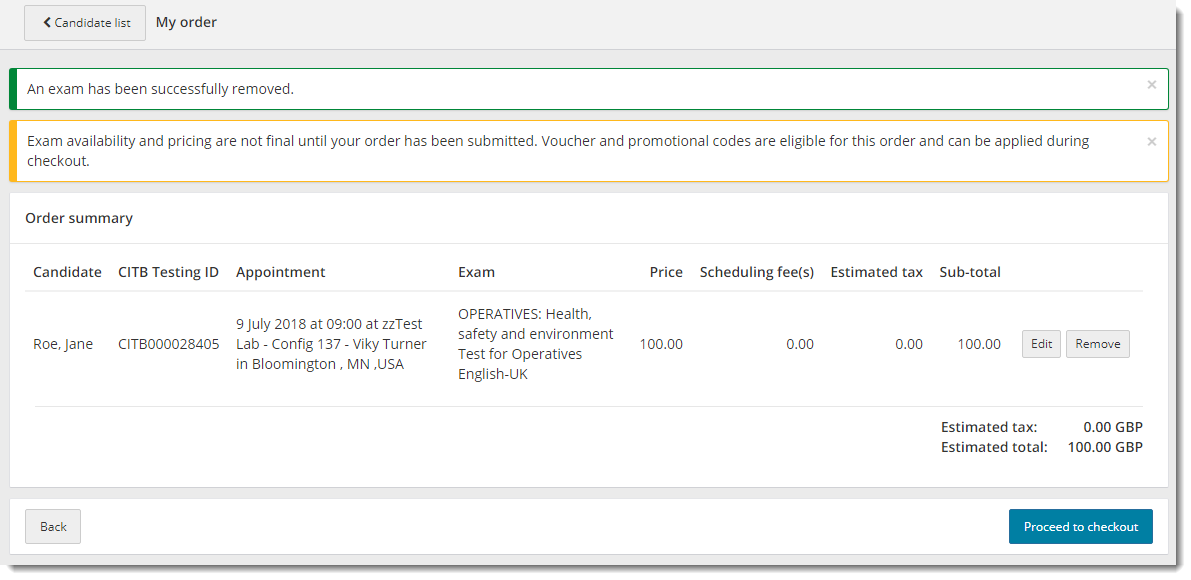
The My order page appears. A message reminds you that exam availability and pricing are not final until your order has been submitted. Since this is an order for a single candidate, voucher and promo codes are eligible for this order and can be applied during checkout. When you have added exams for multiple candidates, vouchers and promo codes cannot be applied. 

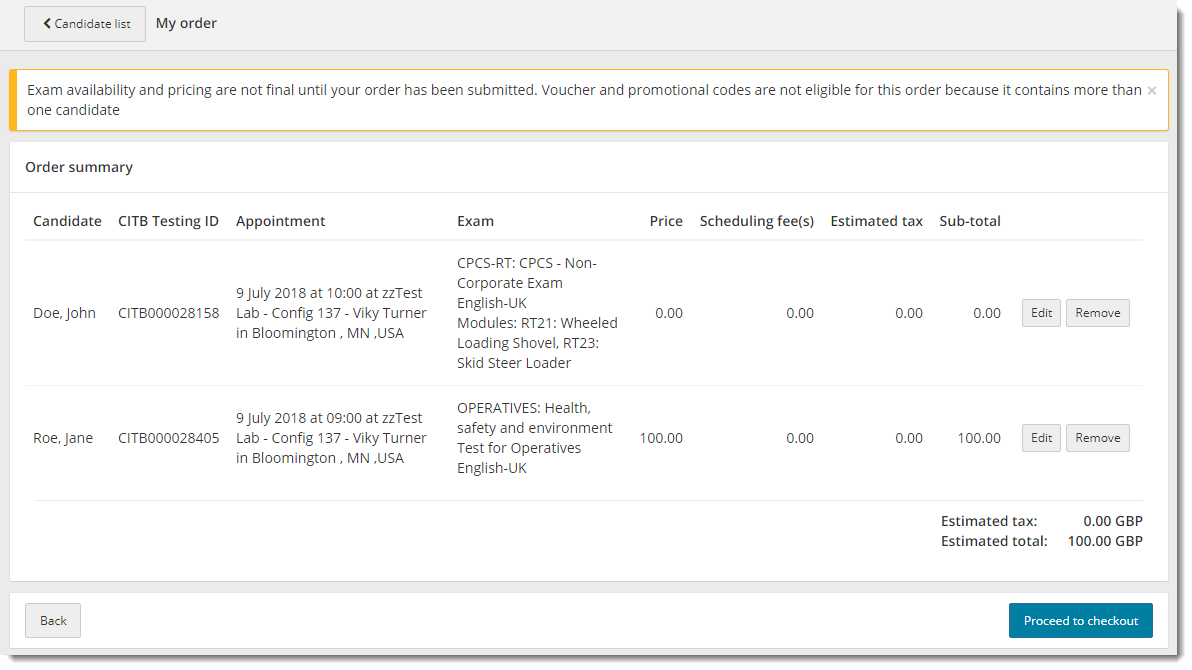
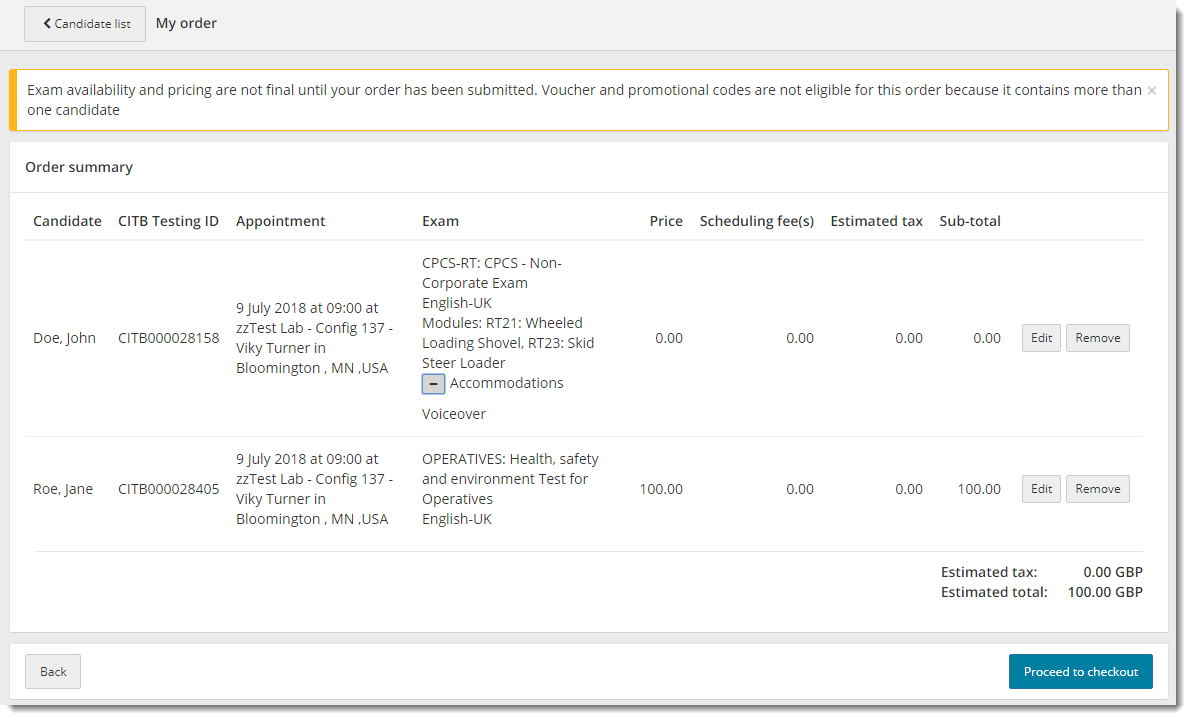
- If any accommodations have been applied to exams, click the Expand Accommodations
 button. The accommodations applied to the exam are listed.

Edit an exam on an order
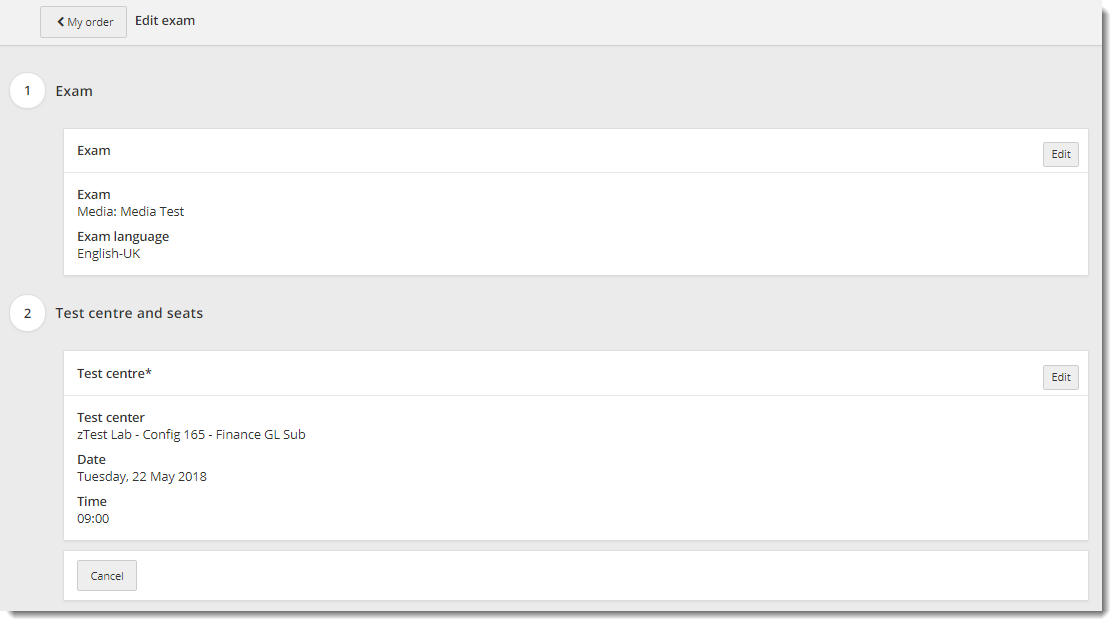
You must view the order before you can edit an exam. From the Edit exam page, you have the option to change the date and start time for a selected exam, or even switch to a different exam.
- On the My order summary page, locate the exam you wish to edit.


- Click the Edit button for that exam.
Modify test centre and seats for an exam registration
|
Note |
Exams are treated as separate exams as soon as they are added to an order. Be aware that if you modify the date or time for an exam that was scheduled as back-to-back, the consecutive relationship between the two exams is not preserved. If you modify the time slot for exams that are scheduled for the same day, the system does not validate if the exams overlap until you submit the order. |
- Click the Test centre and seats Edit button. The Search by address section appears.


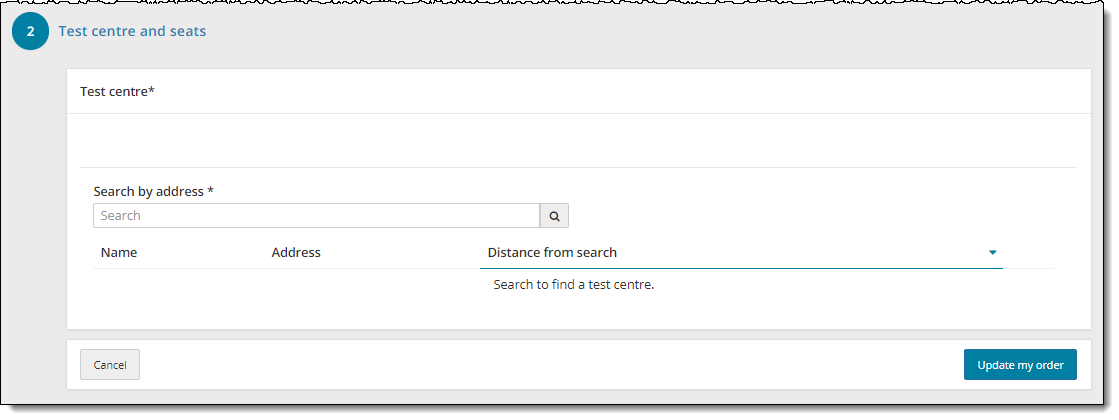
- Enter an address in the Search by Address field and click the Search
 button.
 - Click the Select button for the desired test center.
- Click the desired date on the calendar.
- Locate the desired time slot and select the number of seats you wish to schedule from the Selected seats drop-down list.


- If you wish to cancel the changes, click Cancel and you are returned to the My Order page.
- If you are done making location and time changes, click Update my order. You are returned to the My Order page.
Select a different exam
- Click the Exam Edit button. The Exam section becomes active.
- Select a different exam from the Exam drop-down list.
- Add any Accommodations.
- Click Next. The test centre and seats settings are cleared out.
- Enter an Address in the Search by Address field and click the Search
 button.
 - Click the Select button for the desired test center.
- Click the desired date on the calendar.
- Locate the desired time slot and select the number of seats you wish to schedule from the Selected seats drop-down list.


- If you wish to cancel the changes, click Cancel and you are returned to the My order page.
- If you are done making location and time changes, click Update my order. You are returned to the My order page.
- If you are done making changes to the exam, click Update my order. You are returned to the My order page.
|
Note |
If you modify the time slot for exams that are scheduled for the same day, the system does not validate if the exams overlap until you submit the order. |
Remove an exam from an order
You may remove exams from an order if you have not saved the order. You must view the order before you can remove an exam.
- Click the Remove button for that exam.
A message states the exam has been successfully removed. 

|
Note |
Warning! The exam is removed from the order as soon as you click the Remove button. The only way to add the exam back on to the order is to manually add the exam back onto the order. It is possible to remove all the exams from the order on this screen, so use caution in removing exams on this screen. |
Proceed to checkout
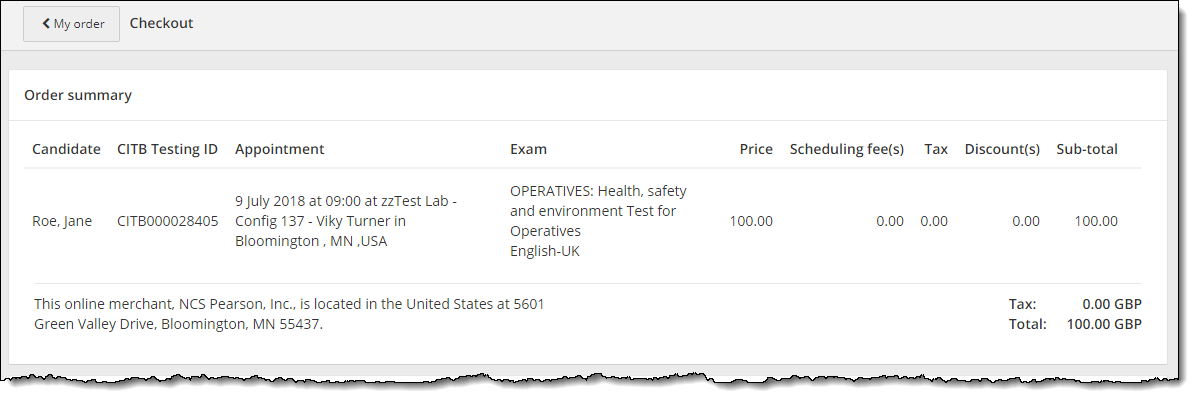
There are four sections on the Checkout page.
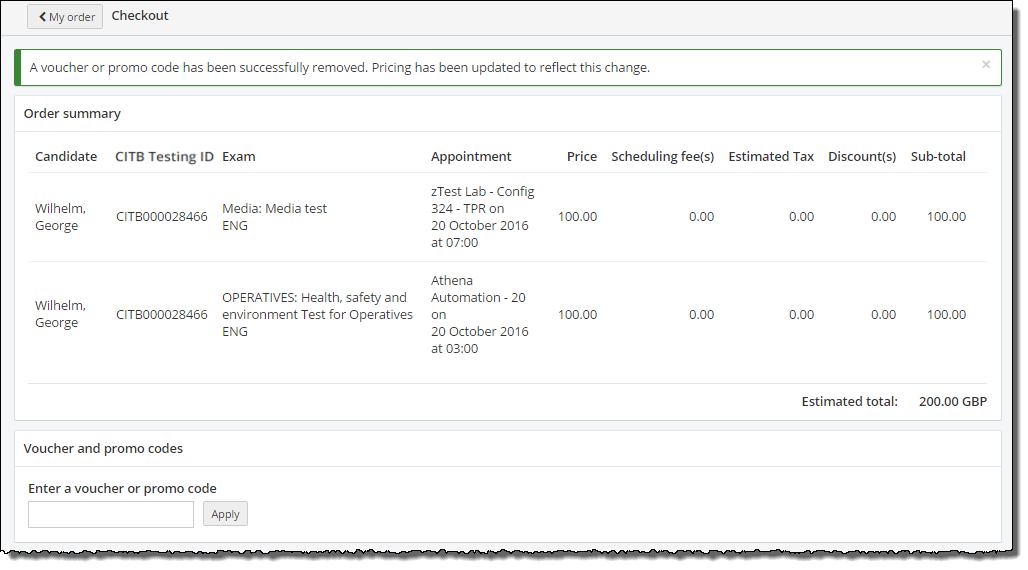
The Order summary lists all the exams on the order for the candidate. The details include the candidate, CCID, exam, appointment date and time, the price of the exam, any scheduling fees, estimated tax, and discounts that have been applied to the exam, and the sub-total for the exam. The estimated total for the entire order is also displayed.
The Voucher and promo codes section allows you to apply vouchers and promo codes to the order.
The Payment information section allows you to apply credit card payments to the order.
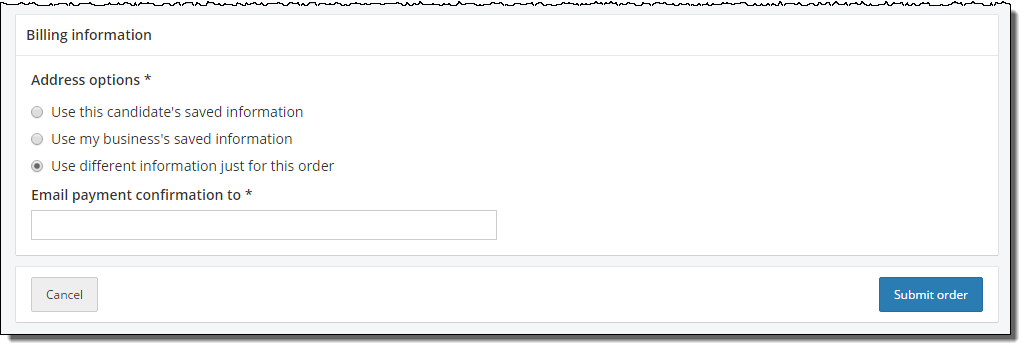
The Billing information section allows you to specify who to bill for the order and who should receive the email confirmation.
Apply a voucher code to the order
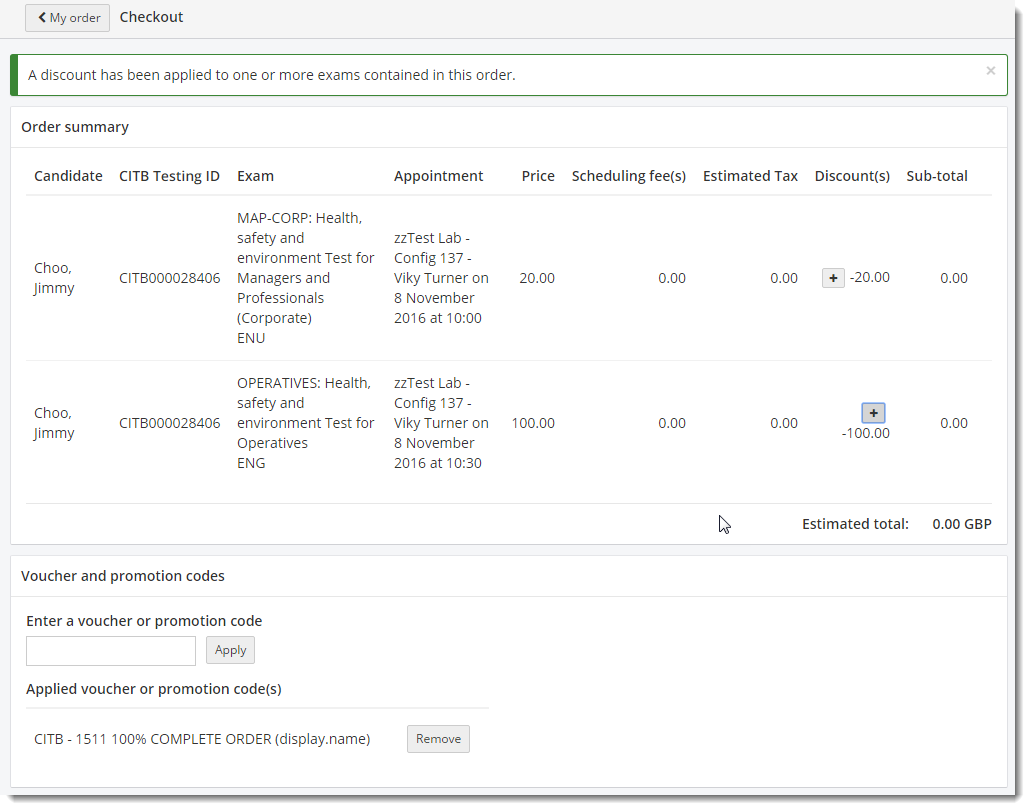
The discount is listed in the Discounts column for the selected exam, and the voucher that was applied to the order is listed in the Voucher and promo codes section. The Estimated total for the order is adjusted with the applied voucher.
- Click the Expand Discount Summary Details
 button to expand a summary of the applied discount.
 Click the Collapse Discount Summary Details
  button to hide the details.
- If the voucher does not cover the entire cost of the order, you may apply additional vouchers or you may pay for the order with a credit card.
Remove a voucher code from an unsubmitted order
If you have not submitted the order, you can remove the voucher code from the order.
- Click the Remove button in the Voucher and promo codes section.


- The voucher is removed from the order. A message states the voucher or promo code has been successfully removed. Pricing has been updated to reflect this change.


Add payment information to the order
- Select the desired credit card from the Card type drop-down list.

 The Required payment fields are displayed for the selected payment type.
- Enter the Card number.
- Select Expiration date from the drop-down lists.
- Enter the Name on the credit card.
- Enter the Security code (if required).
- Enter Issue Number (if required).
- Enter Issue date (if required).
Add billing information to the order
In the billing information section, you must choose which address to use for billing purposes: candidate's saved information, business's saved information, or use different information just for this order. If you are logged in as an Organization user, the saved business information is pulled in from the Organization data. The business information will be blank if you are logged in as a Navigator Scheduler user.
Use this candidate's saved information
- Select the Use this candidate's saved information option.


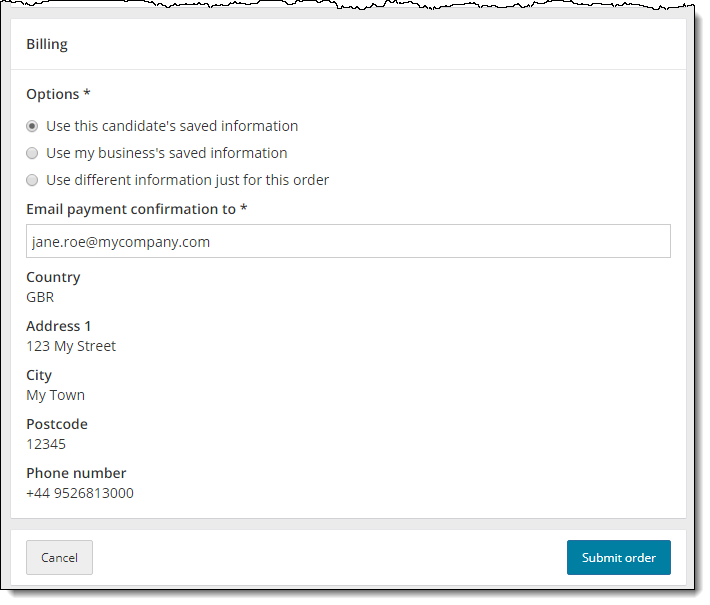
- The Email field automatically populates with the candidate's email address from their candidate profile. You may change the email address if needed.
- The Address information is pulled from the candidate profile and is displayed in read only format.
Use my business's saved information
- Select the Use my business's saved information option.


If you are logged in as an Organizations user, the saved business information is pulled in from the Organization profile on file.
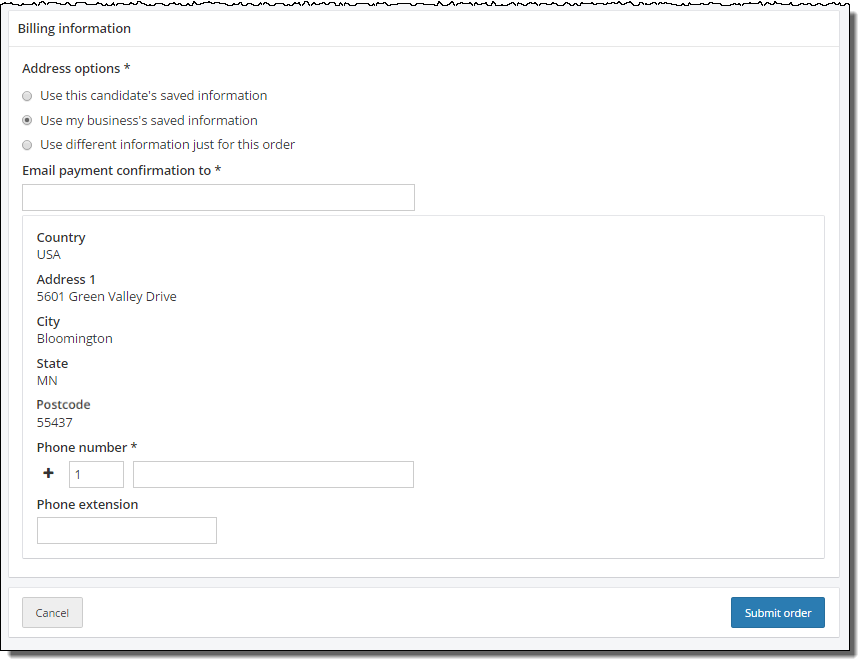
If you are logged in as a Navigator Scheduler user, there is no saved business information in the system, so the address information is blank.
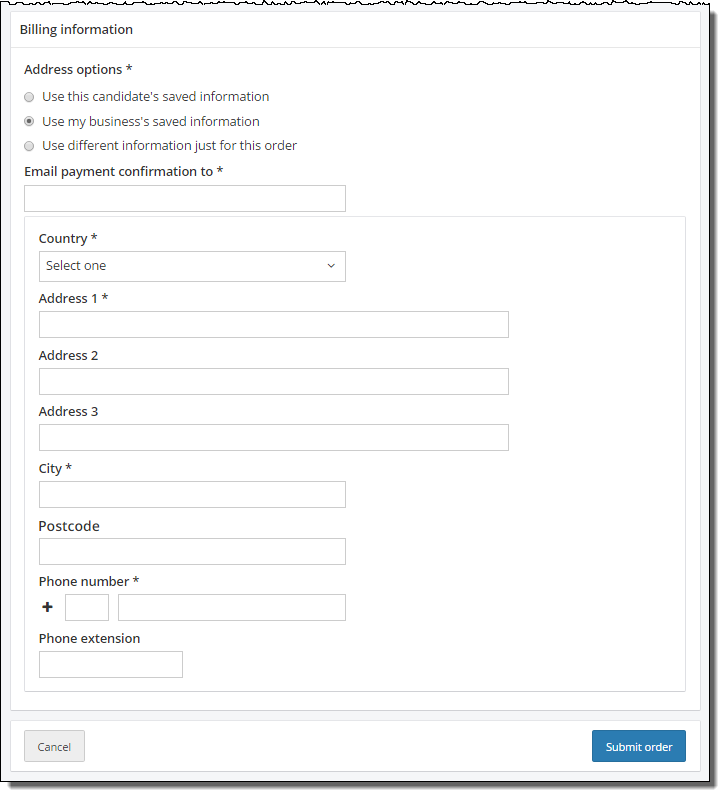
- Enter an Email address to identify where the payment confirmation email must be sent.
- Complete Address information (if necessary).
The Address information is pulled in if you are logged in as an Organizations user. The Address will be blank if you are logged in as a Navigator Scheduler user.
- Enter the Phone number (if necessary).
- Optionally enter the Phone extension.
Use different information just for this order
- Select the Use different information just for this order option.


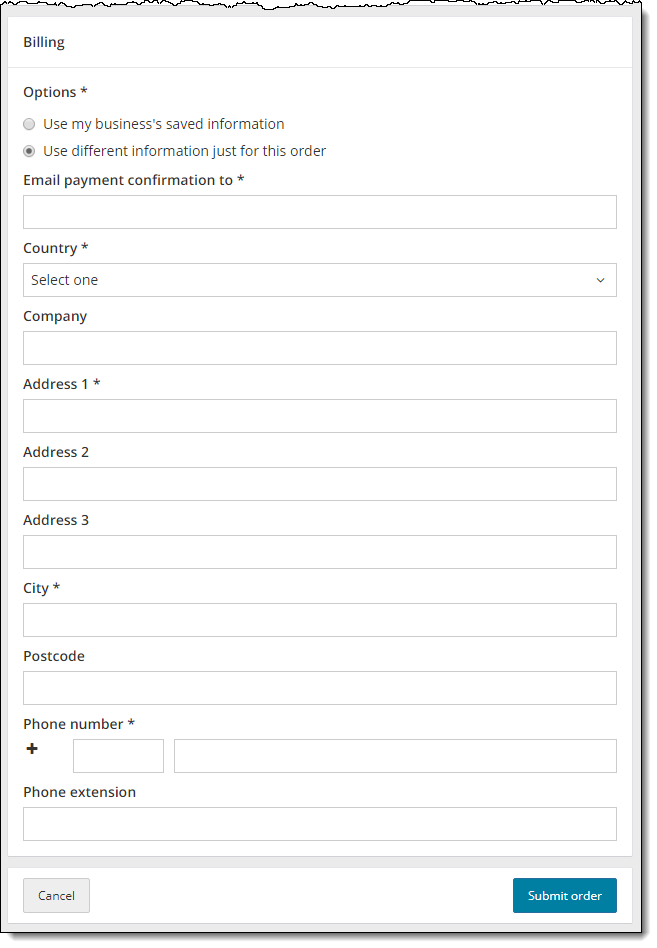
- Enter the mandatory Address fields and optionally fill in the other address fields.
- Enter the Phone number.
- Optionally enter the Phone extension.
Submit the order
Once you have completed the payment and billing information you may submit the order.
- Click Submit order.
The Order confirmation screen appears summarizing the exams on the order, the payment information, and the billing information email address. An order confirmation number is displayed at the top of the page. 

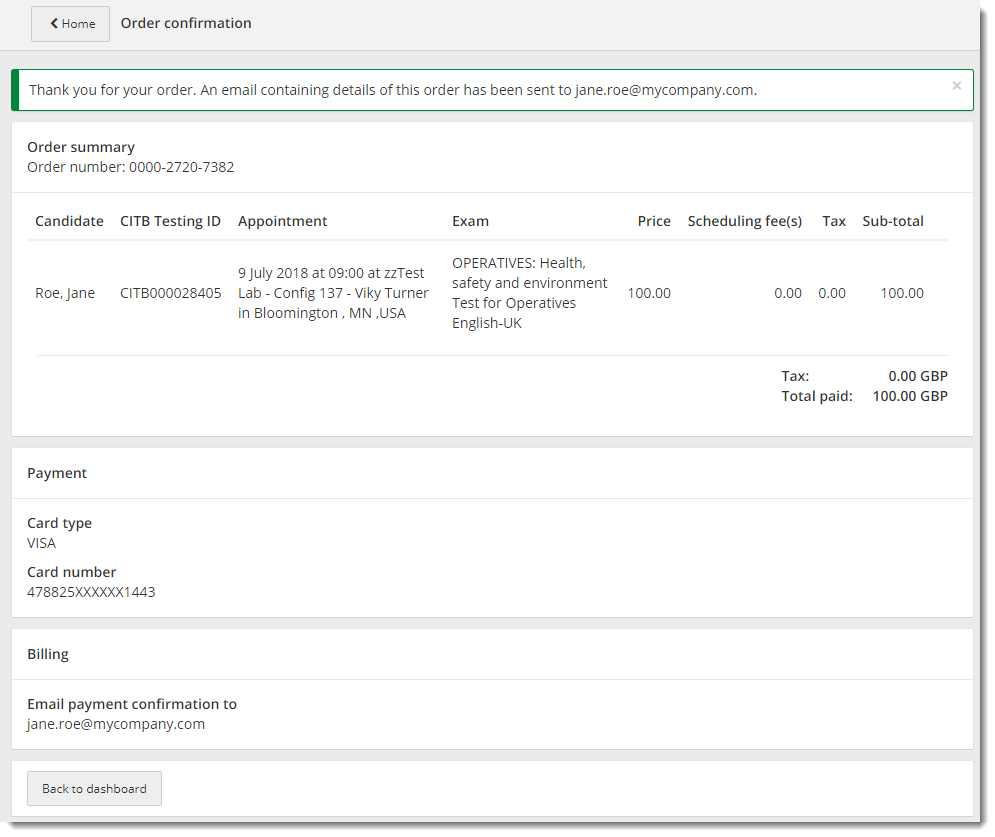
- Click the Home button to return to the Candidate lists page.
Pearson VUE Proprietary and Confidential

