Edit Organizations

Once an organization has been created, you may edit the general information, the contact information, and add or manage user accounts and their permissions. You may also deactivate or reactivate an organization. If you make any modifications to any of the sections, the mandatory fields must be completed. All mandatory fields are marked with an asterisk "*".

Edit organization general information

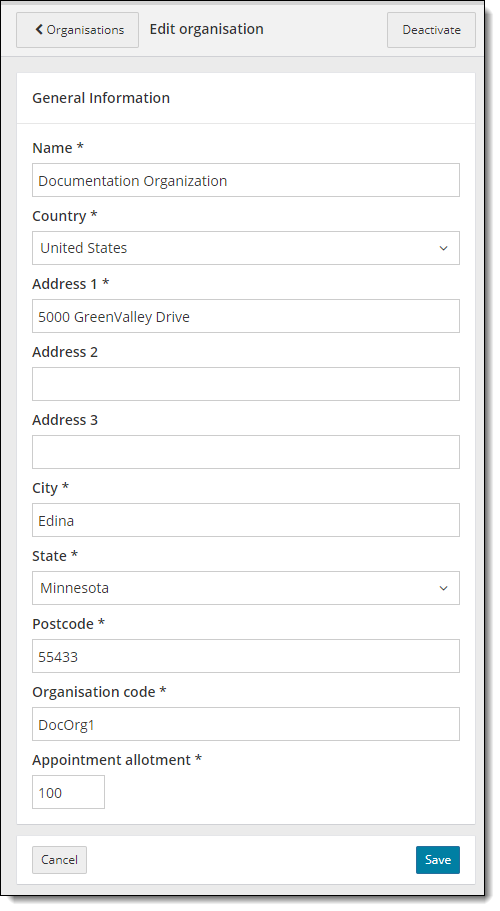
You may edit any of the organization's general information, but you must provide information for all the mandatory fields. Edit general informationEdit general information

Edit general information.

  1. Type a business Name for the organization.

Note icon

Note

  1. Name must be a minimum of 1 character and a max of 100 characters.
  2. Capitalization will be ignored, but character spacing is recognized as part of the name.

For example, "DECEMBER1" and "December1" are the same name. But "December 1" is recognized as a different name.

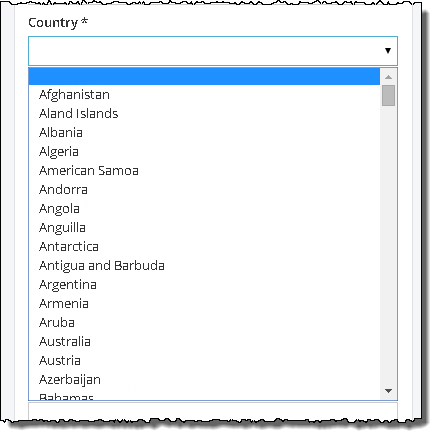
  1. Click the Country drop-down list and select a country for the organization. Select a country for the organization.Select a country for the organization.

    Organization Country drop-down list.

Note icon

Note

Some of the field's mandatory statuses may change depending upon which country you choose.

  1. Type the organization's Address 1.

Note icon

Note

  1. Address 1 must be a minimum of 1 character and maximum of 80 characters.
  1. Type the optional Address 2 and >Address 3 fields if needed.
  2. Type the organization's City.

Note icon

Note

  1. City must be a maximum of 32 characters
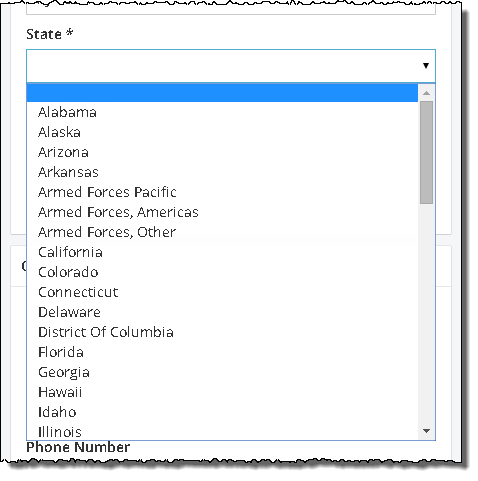
  1. Select the organization's Statefrom the drop-down list if it is mandatory. Organization StateOrganization State

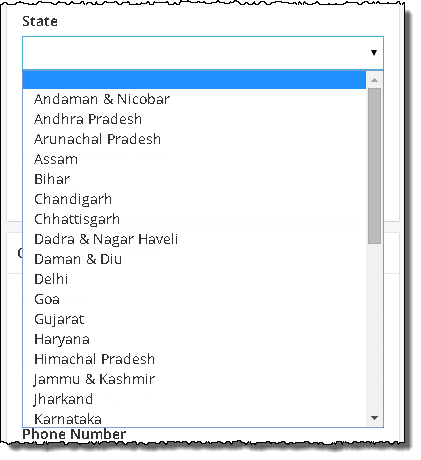
    Organization State drop-down list. Organization State drop-down list - India.

  2. Type the organization's Postcode if it is mandatory.

Note icon

Note

  1. Maximum of 16 characters
  2. There is no validation performed to ensure the postcode entered meets the country's postcode format
  1. Type the mandatory Organization code for the organization.

Note icon

Note

The organization code is mandatory. You can create a code using any combination of characters to provide additional identification or description for the organization. For example: ABC-001

  1. Make sure the organization code is unique. The system does not allow duplicate codes.
  2. Minimum of 1 character and a maximum of 50 characters
  3. Special characters and spaces are allowed within internal system codes
  1. If your organization has an appointment allotment, enter the Appointment allotment. The appointment allotment is the maximum number of open unassigned reservations an organization can have at any given time. If your organization does not use appointment allotments, this field will not be available on the page.

Note icon

Note

Clients that use appointment allotments are granted a 2500 allotment limit. When adding organizations, you specify how many of the 2500 allotments each individual organization can consume.

If you create a new organization and you specify an allotment that exceeds the client allotment limit, you can save the new client and no error is presented. The first time a user goes into Scheduler to try and schedule reservations, a message notifies them their business has a 0 appointment allotment with 0 remaining. Business has 0 appointment allotments remaining.Business has 0 appointment allotments remaining.

Business has 0 appointment allotments remaining.

If the Scheduler user attempts to book a new reservation appointment even with a 0 appointment allotment, a warning message notifies the user that a new appointment cannot be booked because your business has reached its maximum appointment allotment. Cannot book new appointment, max limit reached.Cannot book new appointment, max limit reached.

New appointment cannot be booked, reached max appointment allotment.

You must edit the organization and adjust the appointment allotment. When you save the organization if the total of all your organizations' appointment allotments exceeds the client allotment limit, a message is displayed advising you that you have exceeded your program's appointment allotment limit. Client level allotment exceeded.Client level allotment exceeded.

Client level allotment exceeded max.

To resolve this issue and assign appointment allotments to the organization:

  1. Verify all your inactive organizations have an appointment allotment limit of zero (0).
  2. Reduce the appointment allotment limits for one or more of your other organizations to allow you to assign more to the new organization.

or

  1. Request an increase in your program's appointment allotment limit through your Pearson VUE Programme Manager.
  1. Click Cancel if you do not wish to save your changes. You are returned to the View Organization Details page.
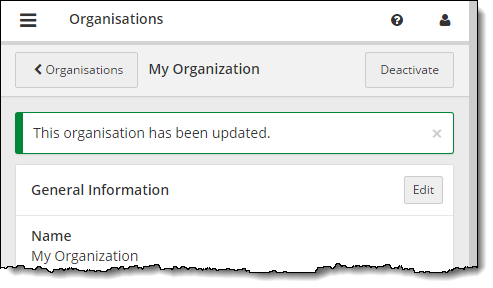
  2. Click Save to retain the changes you made to the organization. You are returned to the View Organization Details page and a message states the organization has been updated. Organization has been updated.Organization has been updated.

    Organization has been updated.

Edit organization contact information

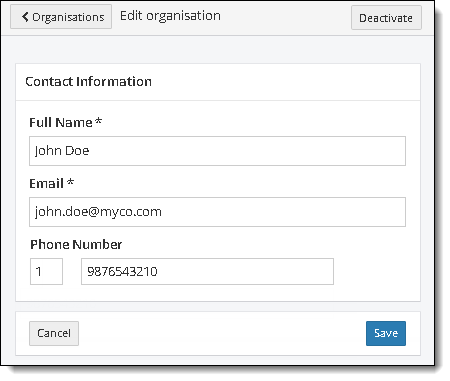
You may edit any of the organization's contact information, but you must provide information for all the mandatory fields. Edit contact informationEdit contact information

Edit contact information.

  1. Modify the Full Name for the contact person.

Note icon

Note

  1. Full Name must be a maximum of 85 characters
  1. Modify the contact's Email address.

The email address must be a valid email format. When you start typing in the Email field the error message appears. Once you have typed in a valid email format the message disappears. The system does not verify that you have typed in a valid email address, it just verifies that the format is valid. Invalid email format.Invalid email format.

Invalid email format.

Note icon

Note

The Email address must adhere to the following characteristics:

  1. Maximum of 255 characters
  2. Cannot contain spaces
  3. They are not case sensitive
  4. Only the following special characters are allowed in email addresses (@, _, -, +, %)
  1. Type the contact's Phone Number.

Note icon

Note

The phone number must be a valid phone number format.

  1. Maximum of 35 numbers
  2. Only enter numbers
  3. Phone numbers may also include spaces
  4. DO NOT type in any of the following characters when entering the phone number: Parentheses ( ), period ., or dash -. If you enter any of the special characters, an invalid phone number error appears. Invalid phone number format.Invalid phone number format. Remove the special characters and the error disappears.

    Invalid phone number format.

  5. No validation is performed to ensure the country code is correct for the selected country
  6. No validation is performed to ensure the phone number meets the country phone format
  1. Click Cancel if you do not wish to save your changes. You are returned to the View Organization Details page.
  2. Click Save to retain the changes you made to the organization. You are returned to the View Organization Details page and a message states the organization has been updated. Organization has been updated.Organization has been updated.

    Organization has been updated.

Deactivate an Organization

You may deactivate an organization from the view organization page or from any of the edit organization pages.

  1. Click the Deactivate Deactivate organization buttonbutton in the upper right-hand corner.
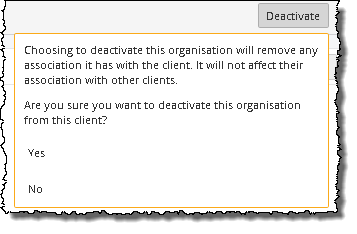
  2. Select Yes in the deactivate verification message. Confirm organization deactivation.Confirm organization deactivation.

    Confirm organization deactivation.

A message states the organization has been deactivated and the Activate button now appears. Organization has been deactivated.Organization has been deactivated.

Organization has been deactivated.

If you try and deactivate an organization with enabled user accounts, you will receive a message stating the organization was not deactivated because there are still enabled user accounts associated to it. You must disable each user's account before the organization can be deactivated. Cannot deactivate organization with active user.Cannot deactivate organization with active user. See Disable a user account for details on how to disable a user account.

Cannot deactivate organization with active users.

Activate an Organization

You may activate an organization that has been deactivated. You can activate the organization from the view organization page or from any of the edit organization pages.

  1. Click the Activate Activate organization button button in the upper right-hand corner.
  2. The organization is automatically activated.

A message states the organization has been activated and the Deactivate button now appears. Organization has been activated.Organization has been activated.

Organization has been activated.

Return to the Organizations Management list

Once you are finished editing the organization details, you may return to the Organizations Management list.

  1. Click the Organizations Return to Organizations list button. button in the upper left-hand corner, or
  2. Click the Done Done button. button in the lower left-hand corner. 


Pearson VUE Proprietary and Confidential