Edit Proctor Exam Authorizations
Once an authorization has been created, you may add exams to the authorization or remove exams from the authorization. There is no way to delete an authorization once it has been added. Instead, you may expire an authorization so it may no longer be used.
Open exam authorization for editing
- Search for the desired proctor account. See Search Proctor Accounts for more details.
- Click the View
 button. See View Proctor Accounts for more details.
The Exam authorizations are listed at the top of the page. 


- Locate the desired authorization and click the Edit
 button.
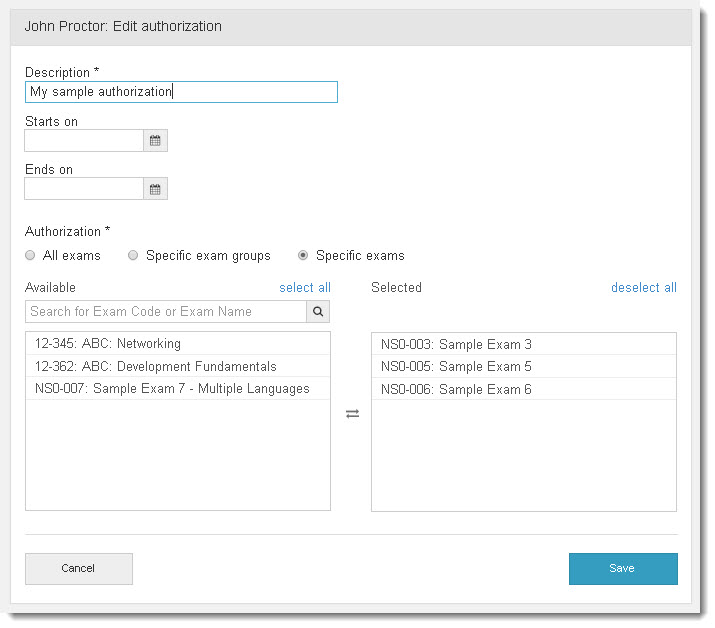
The Edit authorizations page is displayed. 


- Modify the authorization Name.
Add or change start or end date
- Click the Calendar
 button
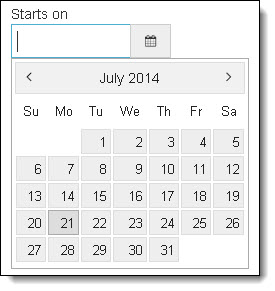
 to set or change the Starts on and Ends on dates.
- Use the Month forward and backward buttons to locate the desired start date. Click the desired date on the calendar.
If you do not set a start and end date for the authorization it is always available.
|
Note |
Keep in mind the dates are set according to the time zone your computer is set to when you set the dates. When you select a date, the start time for that date is 12:00 a.m. unless you select the same date for both the Starts on and Ends on fields. When both the Starts on and Ends on dates are the same, the system adjusts the ends on time to 11:59 p.m. so you will have a full day for the authorization. If you want the authorization to be available only July 30, you would select July 30 for both the Starts on and Ends on dates. Since the dates are set according to your computer date and time, you must account for time zones other than your current time zone. Taking the example above, if you set the authorization Starts on to July 30 and the Ends on to July 30 and you are in CST, the authorization will be available for the entire day of July 30 in CST. If the proctor will be administering the exam in the United Kingdom, there is a 7 hour time difference. The exam will not be available for the entire day in the UK where the exam is being delivered. To account for exam delivery in multiple time zones, it is best to choose the day before the desired event for the Starts on date and the day after the event for the Ends on date. In this example, you would set the Starts on date to July 29 and the Ends on date to July 31. |
Delete start or end date
- Select the date in the Starts on or Ends on date field.
- Hit the Delete key on the keyboard to remove the date from the field.
Assign exams to authorizations
Assign all exams to authorizations
- Select the All exams option.
All of the client's Anywhere Proctored exams will be assigned to the authorization.
Assign individual exams to authorizations
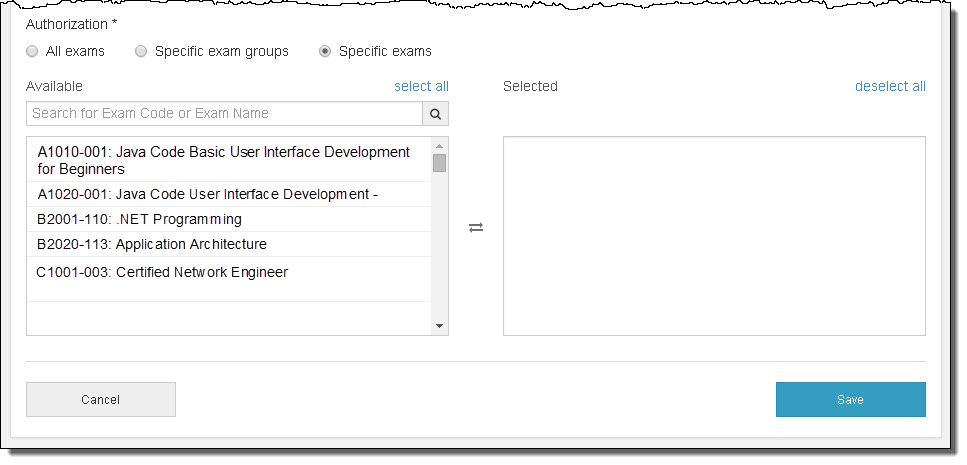
- Select the Specific exams option.
The list of all the client exams are displayed in the Available column. 


|
Note |
If you do not see an exam in the Available exams list that you expected to see, contact your test publisher to ensure the exam has been published. |
- You may search for a specific exam by typing in any part of either the exam name or exam code.
|
Note |
The list of exams is dynamically filtered as you type in the search field. You may type in any part of the exam name or exam code and all exams matching the text entered will be displayed. |
- Scroll through the list of Available exams in the left column and click the desired exam name.
The exam is moved to the Selected column.
- Rather than selecting individual exams from the filtered list, you may also click the select all link.
|
Note |
The select all link behaves differently than the All exams option. The All exams option applies all the client's Anywhere Proctored exams to the Authorization. Use the select all link after filtering the list of exams. For example, filter the list to display all exams for electrical engineering. Then click the select all link. This takes all the exams that have been filtered and displayed in the Available column and applies them to the Authorization in the Selected column. |
- Continue selecting exams you wish to assign to the authorization.
Remove individual exams from authorizations
- Scroll through the list of Selected exams in the right column and click the desired exam name you wish to remove from the Authorization.
If you remove all exams from the Selected exams, a message displays reminding you that no exams are selected for the Authorization. The Authorization must be associated with at least one exam.
Assign exam groups to authorizations
Exam groups are used to display exams in groupings or categories defined by the client. For instance, you could have all of your electrical engineering exams already defined in exam display groups. Then you could assign an authorization to a specific exam group. All exams in the exam group would then be assigned to the authorization. Speak with your program manager if you are interested in setting up exam groups.
Assign individual exam groups to authorizations
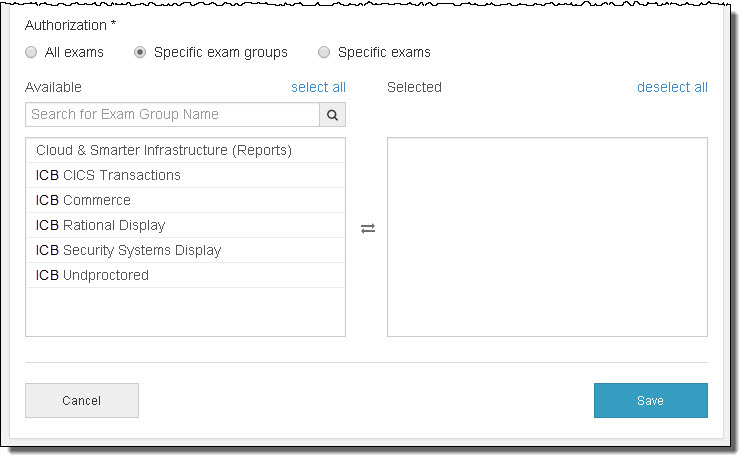
- Select the Specific exam groups option.
The list of all the client exam groups are displayed in the Available column. ![]()
![]()

|
Note |
If you do not see an exam group in the Available exams list that you expected to see, contact your program manager to ensure the exam group has been configured. |
- You may search for a specific exam group by typing in any part of the exam group name.
|
Note |
The list of exams is dynamically filtered as you type in the search field. You may type in any part of the exam group name and all exam groups matching the text entered will be displayed. |
- Scroll through the list of Available exam groups in the left column and click the desired exam group name.
The exam group is moved to the Selected column.
- Rather than selecting individual exam groups from the filtered list, you may also click the select all link.
|
Note |
The select all link behaves differently than the All exams option. The All exams option applies all the client's Anywhere Proctored exams for the selected delivery mode to the Authorization. Use the select all link after filtering the list of exam groups. For example, filter the list to display all exam groups for electrical engineering. Then click the select all link. This takes all the exam groups that have been filtered and displayed in the Available column and applies them to the Authorization in the Selected column. |
- Continue selecting exam groups you wish to assign to the authorization.
Remove individual exam groups from authorizations
- Scroll through the list of Selected exam groups in the right column and click the desired exam group you wish to remove from the Authorization.
If you remove all exam groups from the Selected exams, a message displays reminding you that no exam groups are selected for the Authorization. The Authorization must be associated with at least one exam group.
Deactivate exam authorizations
Authorizations may not be deleted. If you no longer wish to allow a proctor to administer an exam, you may deactivate it by changing the end date of the authorization to a past date.
Reactivate exam authorizations
Exam authorizations that have been deactivated may be reactivated by either deleting the end date or by selecting a future date.
|
Save the authorization
Once you have named the authorization, set the start and end dates, and assigned the exams, you are ready to save the authorization.
- Click Save.
If any of the required fields are not completed, an error message is displayed at the top of the screen and all required fields will be highlighted in red to indicate they must be completed prior to saving the Authorization.
Upon successfully editing the Authorization, you are returned to the proctor authorizations screen. A message above the list states that the Authorization for the user was successfully updated. 


- Click the Proctor list button at the bottom of the screen to return to the Search proctors page.
Pearson VUE Proprietary and Confidential