Search Proctor Accounts
By default, when you first access the Proctor Management application, the Search proctors page is displayed with no proctor accounts displayed in the list.
Basic search for a proctor account
If you have a large list of Proctor accounts, it will not be efficient to tab through the list of accounts. You can search for a proctor by the First name, Last name, Email address, or Proctor ID. If you want to locate a proctor account by searching for both a first and a last name, you must use the Advanced search functionality. See Advanced search for a proctor account.
Display all proctor accounts for a client
All proctor accounts for the client are display in groups of 10 per page on the Search proctors page. 

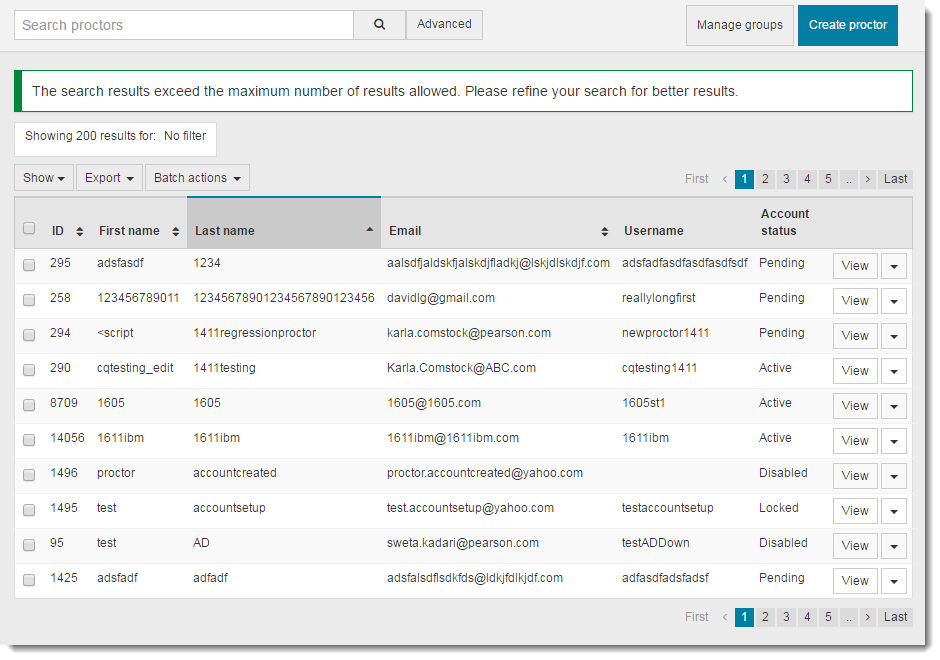
Search for a proctor account
You may search for proctor accounts by typing in text from any part of the following fields: First name, Last name, Email address, or Proctor ID.
|
Note |
You can only search for a proctor account by entering text from one of the desired fields: First name, Last name, Email address, or Proctor ID. For instance, you can enter a first name and then click search. If you want to locate a proctor account by searching for both a first and a last name, you must use the Advanced Search functionality. |
- Click in the Search proctors field.


- Type in the search text.
- Click the Search button or hit the Enter key on the keyboard.
The list is filtered based on the search text entered.
Advanced search for a proctor account
The advanced search function allows you to search for proctor accounts by multiple fields. The basic search only allows you to search for a proctor account based on content in a single field. You may search by Proctor ID, First name, Last name, Email address, groups or tags.
|
Note |
If you entered text in the Search proctors field, when you open the Advanced search panel the Search proctors field is cleared. |
Search by First name, Last name, Email, and/or Proctor ID
When searching for proctor accounts by first name, last name, email address or proctor ID, you may enter one character or a number of characters in each of the fields. The system locates all proctor accounts that match all of the criteria. For instance, if you search for proctors with first name "jo" and last name "john", all proctors that have Jo somewhere in their first name and that have John somewhere in their last name will be displayed.
- Click the Advanced search
 button.
The Advanced search panel opens. 

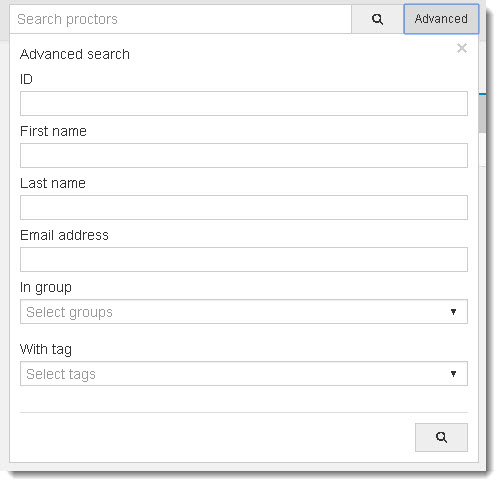
- Enter the characters you wish to search for in the First name, Last name, Email address, and/or ID field.
- Click the Search button
 .
.
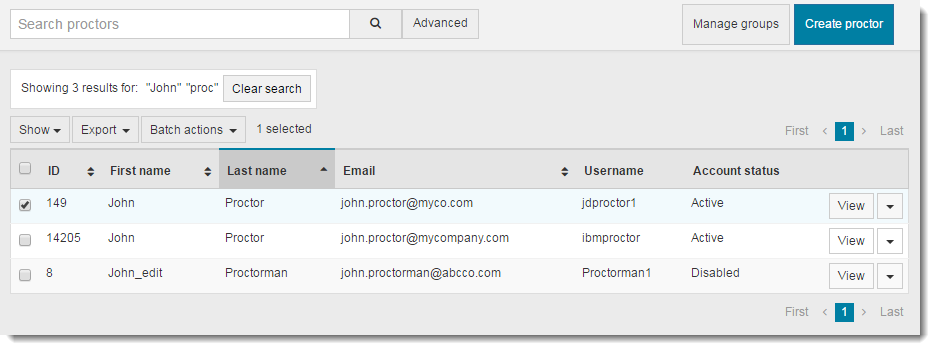
The proctor accounts that match all the search criteria are displayed in the list. The filter criteria are listed in the Clear search box above the list. 

|
Note |
If the search criterion returns too many records, you may refine your advanced search by clicking the Advanced search button again. Your previous search criteria are still listed in the panel. Enter additional search criteria and run the search again. |
Search by Groups
When searching for proctor accounts by group, you may search for any portion of the group name by typing the characters you wish to search for, which will automatically filter the list that matches the characters you typed. Or you may scroll through the list and select the desired group.
You may combine searching for groups with the other advanced search fields and then perform the search.
- Click the Advanced search
 button .
The Advanced search panel opens. 


- Click in the In group field.
- Enter the characters in the Group name you wish to locate, or scroll through the list of groups.
- Click the desired group name in the list.
- Click the Search button
 .
.
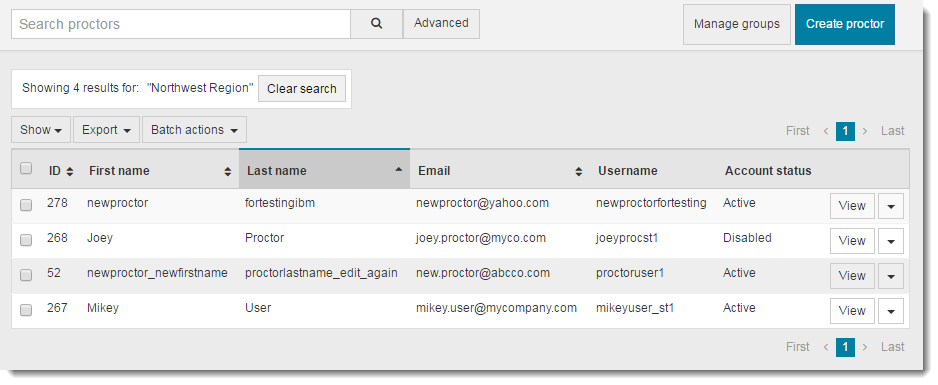
All proctor accounts assigned to the proctor group are displayed in the list. The filter criteria are listed in the Clear search box above the list. 

Search by Tags
When searching for proctor accounts by tag, you may search for any portion of the tag name by typing the characters you wish to search for, which will automatically filter the list that matches the characters you typed. Or you may scroll through the list and select the desired tag.
You may combine searching for tags with the other advanced search fields and then perform the search.
- Click the Advanced search
 button .
The Advanced search panel opens. 


- Click in the With tag field.
- Enter the characters in the With tag field you wish to locate, or scroll through the list of tags.
- Click the desired tag name in the list.
- Click the Search button
 .
.
All proctor accounts assigned to the proctor tag are displayed in the list. The filter criteria are listed in the Clear search box above the list. 

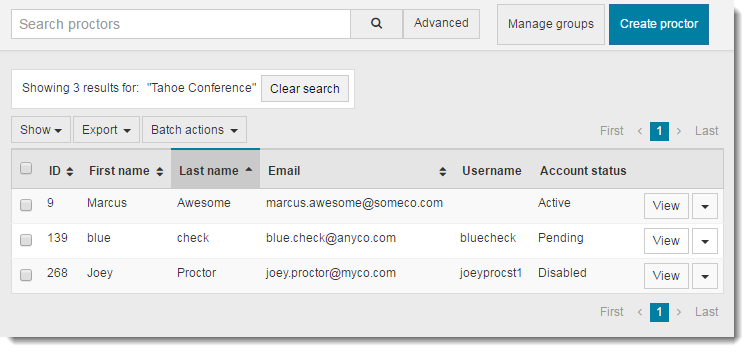
Clear a search
Once a search has been executed you can clear the search and display the entire list of proctor accounts for the client.
All proctor accounts for the client are displayed.
Scroll through pages of proctor accounts
When a client has a large number of proctor accounts, the system displays the list of proctor accounts in groups of 10 per page.
- Click the page numbers

 to display the proctor accounts ten at a time.
- Click the First button to move to the first page.
- Click the Last button to move to the last page.
Sort proctor accounts
By default, the list of Proctor accounts is displayed in ascending order by Last name. The way you can tell is there is an upward  pointing triangle in the Last name column. You may sort the list by ID, First name, Last name or Email.
- To sort the list by a different column, click the Sort
 button of the desired column.
The column is sorted in ascending order.
- Click the Sort
 button.
The list is now sorted in descending order by the selected column. The button now changes to a downward pointing triangle  .
.
Show a proctor account
By default, all proctor user accounts are displayed in the list when you perform a search. Once a proctor user account is added to the system, an email with a link to activate the account is sent to the email address listed for the user. The proctor user account is in a pending status until the user sets their password and security questions. The set new user password and security questions email link will be available for 7 days. If the user does not login to Navigator within 7 days, the email link will no longer work. The client administrator must reset the account, which generates a new email link, so the user may set their password and security questions.
- Click the Show drop-down list.


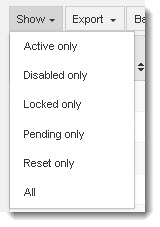
- Select the group of proctor user accounts you wish to view from the Show drop-down list.
|
Active only |
Only proctor user accounts that have been activated are displayed. |
|
Disabled only |
Only proctor user accounts that have been disabled are displayed. |
|
Locked only |
Only proctor user accounts that are locked are displayed. Proctor users that have attempted to login to Navigator without the correct password are placed into a locked state. You must reset the account, which generates a new email link that allows the user to add a password and select security questions. Proctor users may also click the Forgot Login link on the Navigator sign in page to reset their own password or to receive a reminder on what their user name is. |
|
Pending only |
Only proctor user accounts that have been added to the system but have not been activated yet are displayed. If a user account is in a pending state and the link to login and set up their user account expires, you may reset their account. The status of the account remains in a pending status until the user logs in and changes their password and security questions even though the account has been reset. |
|
Reset only |
Only proctor user accounts that are currently in a reset status are displayed. The client's Navigator administrator has reset the accounts, but users have not logged in to provide their security question answers and set a new password if they are in a reset status. User accounts that were in a pending status (that is, the user has not logged in yet and their account setup link has expired) that are reset will not appear with a Reset status. They stay in a Pending status until the user logs in and changes their password and security questions. |
|
All |
All proctor user accounts are displayed in all statuses (Active, Disabled, Locked, Pending, and Reset). |
The list displays the selected group of proctor user accounts.
Disable a proctor account
There are two methods of disabling a proctor user account: you may do a quick disable using the Enable account/Disable account menu from the proctor account list view explained in this section, or you may view the proctor account and use the Enable account/Disable account menu from the View proctor account page described in the View Proctor Account topic.
|
Note |
Users with the Proctor Management Client admin proctor role have the ability to disable a proctor account to prevent the user from proctoring/unlocking exams. However, just because a VUE Admin and Super User can disable a client user account, they should not do so. Only a Client Admin proctor should disable a client user account. There is no way to remove the proctor role from the user account once it has been added; you may only disable the proctor role to prevent a user from administering Anywhere Proctored exams. If the proctor has no other Navigator roles, when you disable the proctor account the user account is also disabled. The proctor user will be prevented from logging in to Navigator. If the proctor account is assigned other Navigator roles, then the user account is still active so the user may still access the other Navigator applications. The user is only prevented from administering Anywhere Proctored exams. If you wish to completely disable the user account, you must do this within the User Management application. See the User Management online help for assistance. |
- Search for the desired proctor account in the list.
- Click the drop-down menu button
 in the far right column and select Disable account from the menu.


A message states that the user account was disabled. 
 If the proctor account has other Navigator roles assigned, additional messaging directs you to the User Management application.
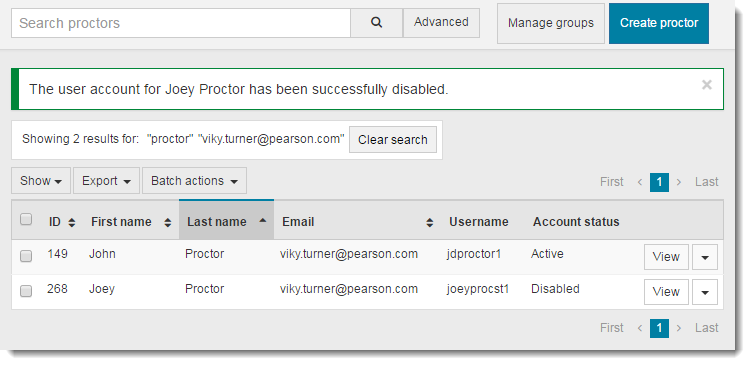

|
Note |
Proctor accounts may only be disabled by users with the Proctor Management Client admin proctor role or Client administrators permission. Within the User Management application, the user account will still list that the user account has been assigned the Proctor role. To view the proctor role status, you must use the Proctor Management application to identify if the proctor role is enabled or disabled. |
Enable a proctor account
By default, all proctor accounts are listed on the Proctor list page. Only Disabled user accounts may be enabled, so you may want to filter the list to display only disabled user accounts. There are two methods of enabling a proctor account: you may do a quick enable using the Enable account/Disable account menu from the proctor list view, or you may view the proctor account and use the Enable account/Disable account menu from the View proctor account page.
- Show only disabled proctor accounts.
- Locate the desired proctor account in the list.
- Click the drop-down menu button
 in the far right column and select Enable account from the menu.


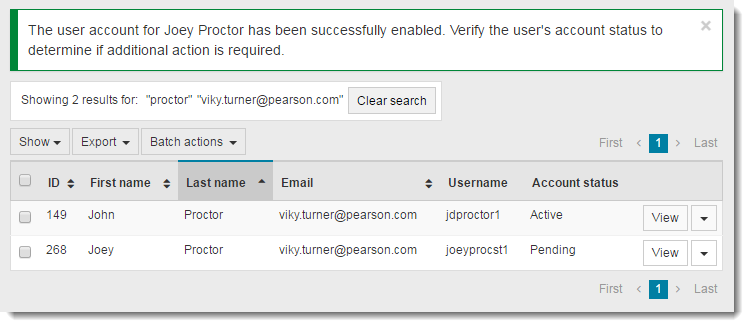
A message states that the user account was successfully enabled. 
 The user account is removed from the list of disabled user accounts and returned to the previous state it was in before it was disabled. This could be Pending, Locked, Reset, or Active. The Client Admin must verify if additional action is required for the user account to be enabled, e.g., an account in a pending state will likely require the admin to reset the account before the user can complete the account setup and log on to Navigator.
Batch disable proctor accounts
Disabling a single proctor account at a time can be very time consuming. There is an option to disable a group of proctor accounts all at once. First you must search for the desired proctor accounts, select them, and then you can disable them all in one batch.
|
Note |
Users with the Proctor Management Client admin proctor role have the ability to disable an active proctor account to prevent the user from proctoring/unlocking exams. There is no way to remove the proctor role from the user account once it has been added; you may only disable the proctor role to prevent a user from administering Anywhere Proctored exams. If the proctor account has no other Navigator roles, when you disable the proctor account the user account is also disabled. The user is prevented from logging in to Navigator. If the proctor account has other Navigator roles, then the user account is still active so the user may still access the other Navigator applications. If you wish to completely disable the user, you must do this within the User Management application. See the User Management online help for assistance. |
- Search for the desired proctor accounts in the list using either the simple search or advanced search listed above.
- Click the check boxes of the desired proctor accounts you wish to disable.


- Click the Batch actions drop-down menu and select Disable account.


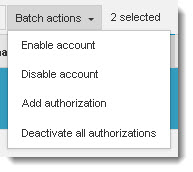
The selected proctor accounts are disabled. A message identifies the number of user accounts that were disabled. 


The proctor accounts are moved to the disabled proctors list.
Batch enable proctor accounts
Enabling a single proctor account at a time can be very time consuming. There is an option to enable a group of proctor accounts all at once. First you must search for the desired disabled proctor accounts, select them, and then you can enable them all in one batch.
- Search for the desired disabled proctor accounts in the list using either the simple search or advanced search listed above.
- Click the check boxes of the desired proctor accounts you wish to enable.


- Click the Batch actions drop-down menu and select Enable account.


The selected proctor accounts are enabled. A message identifies the number of proctor user accounts that were enabled. 


The user account is removed from the list of disabled user accounts and returned to the previous state it was in before it was disabled. This could be Pending, Locked, Reset, or Active. The Client Admin must verify if additional action is required for the user account to be enabled, e.g., an account in a pending state will likely require the admin to reset the account before the user can complete the account setup and log on to Navigator.
Batch add authorizations
To save time, if you have a group of proctors that must all be authorized for the same exam, you may select all the proctor accounts and batch add authorizations to the group of proctor accounts.
- Search for the desired proctor accounts in the list using either the simple search or advanced search listed above.
- Click the check boxes of the proctor accounts to which you wish to add authorizations.


- Click the Batch actions drop-down menu and select Add authorization.


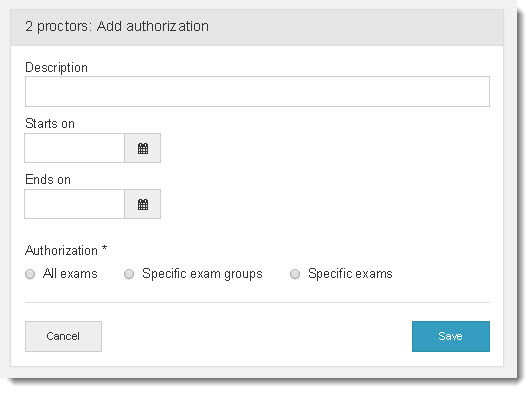
The Add authorization page is displayed where you can name the new authorization, specify start and end dates, and assign exams or exam groups to the new authorization. 

Name the Authorization
- Enter a Description for the new authorization. The authorizations should be a meaningful name, such as the types of exams the proctor is being authorized to unlock.
|
Note |
The Authorization Description must adhere to the following characteristics:
|
Set authorization start and end dates
The start and end dates allow you to specify the calendar dates in which a proctor may unlock an exam. For instance, a proctor may be proctoring an Anywhere Proctored event on July 30.
- Click the Calendar
 button
 to set the Starts on and Ends on dates.
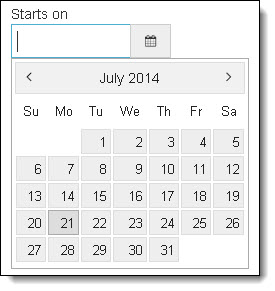
- Use the Month forward and backward buttons to locate the desired start date. Click the desired date on the calendar.
If you do not set a start and end date for the authorization, it is always available.
|
Note |
Keep in mind the dates are set according to the time zone your computer is set to when you set the dates. When you select a date, the start time for that date is 12:00 a.m. unless you select the same date for both the Starts on and Ends on fields. When both the Starts on and Ends on dates are the same, the system adjusts the ends on time to 11:59 p.m. so you will have a full day for the authorization. If you want the authorization to be available only July 30, you would select July 30 for both the Starts on and Ends on dates. Since the dates are set according to your computer date and time, you must account for time zones other than your current time zone. Taking the example above, if you set the authorization Starts on to July 30 and the Ends on to July 30 and you are in CST, the authorization will be available for the entire day of July 30 in CST. If the proctor will be administering the exam in the United Kingdom, there is a 7 hour time difference. The exam will not be available for the entire day in the UK where the exam is being delivered. To account for exam delivery in multiple time zones, it is best to choose the day before the desired event for the Starts on date and the day after the event for the Ends on date. In this example, you would set the Starts on date to July 29 and the Ends on date to July 31. |
Assign all exams to authorizations
- Select the All exams option.
All of the client's Anywhere Proctored exams will be assigned to the authorization.
Assign individual exams to authorizations
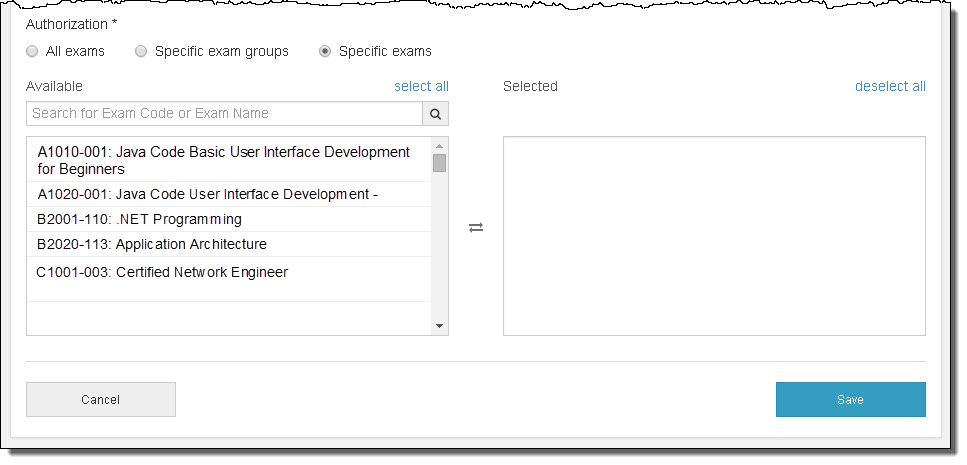
- Select the Specific exams option.
The list of all the client Anywhere Proctored exams are displayed in the Available column. 

|
Note |
If you do not see an exam in the Available exams list that you expected to see, contact your test publisher to ensure the exam has been published. |
- You may search for a specific exam by typing in any part of either the exam name or exam code.
|
Note |
The list of exams is dynamically filtered as you type in the search field. You may type in any part of the exam name or exam code and all exams matching the text entered will be displayed. |
- Scroll through the list of Available exams in the left column and click the desired exam name.
The exam is moved to the Selected column.
- Rather than selecting individual exams from the filtered list, you may also click the select all link.
|
Note |
The select all link behaves differently than the All Exams option. The All exams option applies all the client's Anywhere Proctored exams to the Authorization. Use the select all link after filtering the list of exams. For example, filter the list to display all exams for electrical engineering. Then click the Select all link. This takes all the exams that have been filtered and displayed in the Available column and applies them to the Authorization in the Selected column. |
- Continue selecting exams you wish to assign to the authorization.
Remove individual exams from authorizations
- Scroll through the list of Selected exams in the right column and click the desired exam name you wish to remove from the Authorization.
If you remove all exams from the Selected exams, a message displays reminding you that no exams are selected for the Authorization. The Authorization must be associated with at least one exam.
Assign individual exam groups to authorizations
Exam groups are used to display exams in groupings or categories defined by the client. For instance, you could have all of your electrical engineering exams already defined in exam display groups. Then you could assign an authorization to a specific exam group. All exams in the exam group would then be assigned to the authorization. Speak with your program manager if you are interested in setting up exam groups.
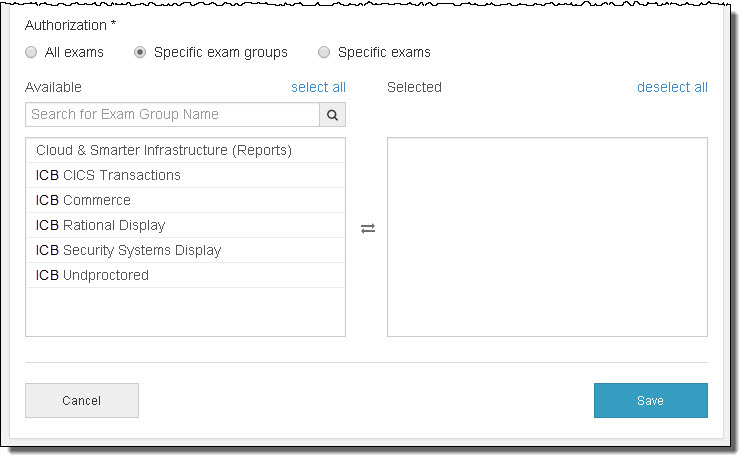
- Select the Specific exam groups option.
All client exam groups are displayed in the Available column. 

|
Note |
If you do not see an exam group in the Available exams list that you expected to see, contact your program manager to ensure the exam group has been configured. |
- You may search for a specific exam group by typing in any part of the exam group name.
|
Note |
The list of exams is dynamically filtered as you type in the search field. You may type in any part of the exam group name, and all exam groups matching the text entered will be displayed. |
- Scroll through the list of Available exam groups in the left column and click the desired exam group name.
The exam group is moved to the Selected column.
- Rather than selecting individual exam groups from the filtered list, you may also click the select all link.
|
Note |
The select all link behaves differently than the All exams option. The All exams option applies all the client's Anywhere Proctored exams to the Authorization. Use the select all link after filtering the list of exam groups. For example, filter the list to display all exam groups for electrical engineering. Then click the select all link. This takes all the exam groups that have been filtered and displayed in the Available column and applies them to the Authorization in the Selected column. |
- Continue selecting exam groups you wish to assign to the authorization.
Remove individual exam groups from authorizations
- Scroll through the list of Selected exam groups in the right column and click the desired exam group you wish to remove from the Authorization.
If you remove all exam groups from the Selected exams, a message displays reminding you that no exam groups are selected for the Authorization. The Authorization must be associated with at least one exam group.
Save the authorization
Once you have named the authorization, set the start and end dates, and assigned the exams, you are ready to save the authorization.
- Click Save.
If any of the required fields are not completed, an error message is displayed at the top of the screen and all required fields are highlighted in red to indicate they must be completed prior to saving the Authorization.
Upon successful Authorization creation, you are returned to the search proctors screen. A message above the list states that Authorization for the number of proctors was added. 


Batch deactivate authorizations
There may be times when you no longer wish to allow a group of proctors to administer any Anywhere Proctored exams. You may deactivate ALL authorizations for a set of proctors using the batch deactivate authorizations function.
|
Note |
The batch deactivate authorizations feature does not allow you to pick and choose which authorizations you wish to deactivate. When you use this feature, all authorizations for the selected proctors are deactivated. If you wish to deactivate individual exam authorizations, see the Deactivate exam authorizations topic. There is no undo function if you deactivate all the authorizations for a proctor. If you wish to reactivate exam authorizations, you must edit each proctor's exam authorizations individually. See the Reactivate exam authorizations topic for assistance. |
- Search for the desired proctors in the list using either the simple search or advanced search listed above.
- Click the check boxes of the proctors from which you wish to remove authorizations.


- Click the Batch actions drop-down menu and select Deactivate all authorizations.


|
Note |
All authorizations for the selected proctors have been deactivated. A message states all authorizations for the number of selected proctors have been deactivated.
|
Export proctor account list
Rather than scrolling through the list of proctor accounts within Proctor Management, you may want to export a list of proctor accounts to an external list. This can be done via the Export feature. The content is exported into a Comma Separated Value (.csv) file. You may use Microsoft Excel or a text editor to open the file.
Export all proctor accounts
You may export the list of all your proctor accounts within Proctor Management. The list will include all proctor accounts that have been entered into the system in any state, active, disabled, locked, pending, or reset.
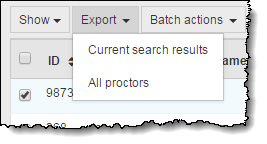
- On the Search Proctors page, click the Export drop-down arrow and select the All proctors menu.


- If the file did not automatically open, open Windows Explorer and navigate to the Downloads directory.
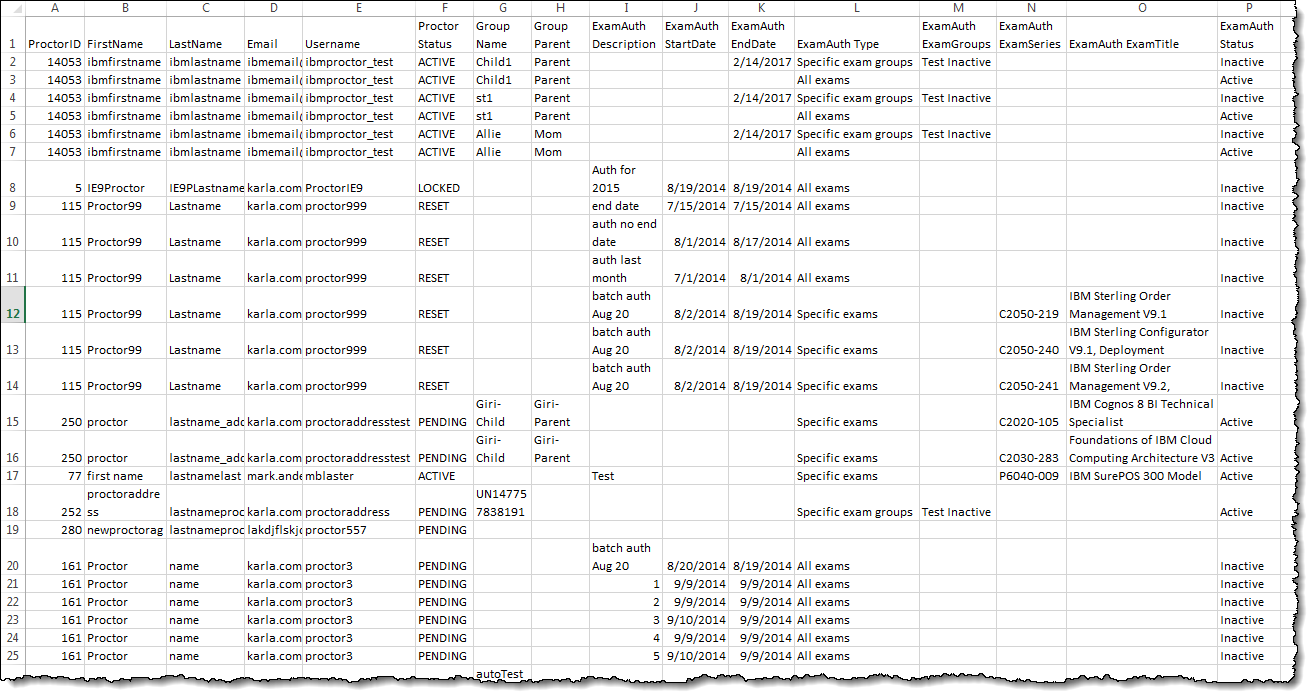
- Open the comma separated value (csv) file using Microsoft Excel or a text editor.


Export a filtered list of proctor accounts
You can filter a list of proctor accounts to display a subset of all your proctor accounts within Proctor Management and then export the filtered list.
- Search for the desired list of proctor accounts.
- Click the Export drop-down arrow and select the Current search results menu.


- If the file did not automatically open, open Windows Explorer and navigate to the Downloads directory.
- Open the comma separated value (csv) file using Microsoft Excel or a text editor.


Proctor Management export file descriptions
The table below describes each of the fields that are included in the Proctor Management export file.
|
Note |
By default, the exported list is sorted alphabetically by last name. If you sort the list by first name or ProctorID before you export the list, the list retains the sort order you selected prior to exporting the list. |
|
Column |
Content Description |
|
ProctorID |
The unique ID assigned to the proctor user account. This is a system generated unique number. |
|
FirstName |
The first name of the proctor. |
|
LastName |
The last name of the proctor. |
|
|
The email address for the user. |
|
Username |
The username the proctor uses to log on to the Navigator portal. |
|
Proctor Status |
The current status of the Navigator user account: ACTIVE, PENDING, RESET, or LOCKED. Note: This column does not identify if a proctor role has been disabled. This status reflects the Navigator user status.
|
|
Group Name |
The name of the group to which the proctor is assigned. Groups are used to associate a number of proctors together. |
|
Group Parent |
The name of the parent group to which the proctor is assigned. Parent groups are used to associate a number of groups together. |
|
ExamAuth Description |
The name given to the exam authorization. |
|
ExamAuth StartDate |
The start date specifies the first calendar date in which a proctor may unlock an exam. |
|
ExamAuth EndDate |
The end date specifies the last calendar date in which a proctor may unlock an exam. If the end date is a date prior to the current date, the authorization is listed as Inactive in the ExamAuth Status column. |
|
ExamAuth Type |
This identifies the type of exam authorization: All exams, Specific exam groups, or Specific exams. |
|
ExamAuth ExamGroups |
If this authorization has an exam group assigned to it, the name of the exam group is listed in this column, and the exam series and exam title columns are blank. The specific exams in the exam group are not listed. If the authorization is assigned to all exams, the exam group, exam series and exam title columns are all blank. The specific exams are not listed. |
|
ExamAuth ExamSeries |
Identifies the exam series that is assigned to the authorization. If there are multiple exams assigned to a single authorization, each exam series is listed on a separate row in the export table. |
|
ExamAuth ExamTitle |
Identifies the exam title that is assigned to the authorization. If there are multiple exams assigned to a single authorization, each exam title is listed on a separate row in the export table. |
|
ExamAuth Status |
Identifies if the authorization is Active or Inactive. |
Pearson VUE Proprietary and Confidential


